【CI/CD】tfnotify と GitHub App で Terraform の CI 機構を作ってみる【CodeBuild】

こんにちは。お久しぶりです。
新しい会社に移ってから、約半年が経過しました。
周りの皆様はとてもレベルが高く、大変素晴らしい環境でお仕事をさせていただいております。
本当に心の底から転職して良かったな、と感じる今日この頃です。

さて、本日は、とあるシステムの構築に携わらせていただき、Terraform の CI 機構を CodeBuild / GitHub App / tfnotify で作る機会があったので、その際の備忘録をツラツラと残しておこうと思います。

作るもの

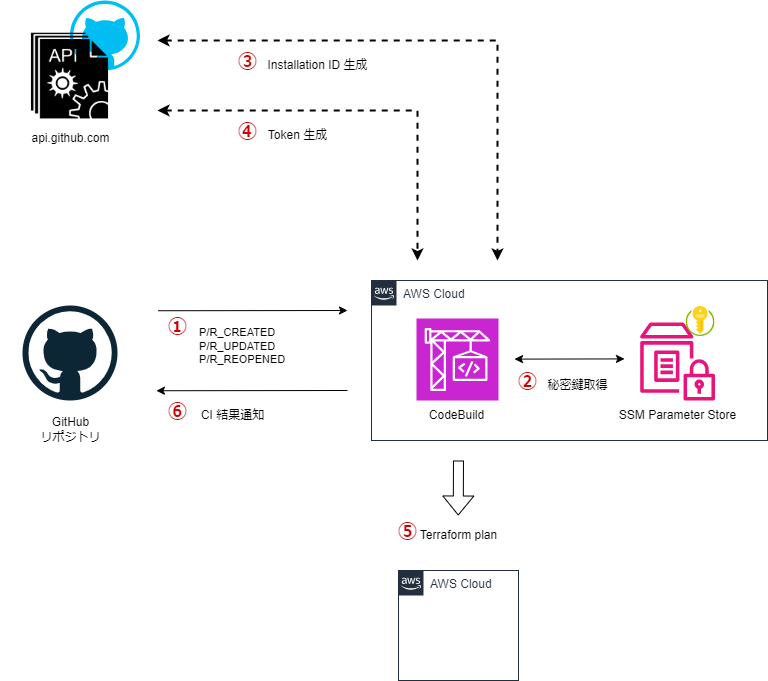
構成

Terraform のコード自体は GitHub のリポジトリでホストされていることを前提とします。
Pull Request の作成、更新時に CodeBuild を Hook して Terraform を実行し、plan 結果を Pull Request のコメントとして通知します。
詳細なシーケンスは以下の通りです。

① PR の作成、更新をトリガーに CodeBuild を起動。
② CodeBuild が SSM Parameter Store に格納された GitHub App の秘密鍵を取得
③ GitHub App の秘密鍵から JWT を生成し、 API を叩いて Installation ID を生成
④ Installation ID を指定して API を叩き、Access Token を生成
⑤ terraform plan を実行
⑥ plan 結果を tfnotify に渡して Pull Request に通知
⑦ Access Token を無効化

ディレクトリ構成

.
├── deploy_scripts
│   └── ci
│       ├── .tfnotify.yml
│       ├── bin
│       │   ├── create_github_token.sh
│       │   ├── install_terraform.sh
│       │   ├── install_tfnotify.sh
│       │   ├── plan_tfnotify.sh
│       │   └── revoke_github_token.sh
│       └── buildspec.yml
└── env
    └── dev
        ├── resource1
        │   ├── 00_backend.tf
        │   ├── 00_provider.tf
        │   └── vpc.tf
        ├── resource2
        │   ├── 00_backend.tf
        │   ├── 00_provider.tf
        │   └── vpc.tf
        └── resource3
            ├── 00_backend.tf
            ├── 00_provider.tf
            └── vpc.tf

Terraform のコードは /env/dev/resource[1 – 3] 配下の 3 つをエントリーポイントとするディレクトリ構成を前提とします。

また、/deploy_scripts/ci/bin 配下に GitHub App より Token を発行するスクリプトや、Terraform の実行結果を通知するためのユーティリティスクリプトを配置します。

buildspec.yml

CodeBuild の処理を定義する buildspec.yml は以下の通りです。

---
version: 0.2
  
phases:
  install:
    runtime-versions:
      golang: latest
    commands:
      - /bin/bash ${CODEBUILD_SRC_DIR}/deploy_scripts/ci/bin/install_terraform.sh
      - /bin/bash ${CODEBUILD_SRC_DIR}/deploy_scripts/ci/bin/install_tfnotify.sh
  pre_build:
    commands:
      - export APP_ID=$(aws ssm get-parameter --name ${APP_ID_SSM_ARN} --with-decryption --query Parameter.Value --output text)
      - export APP_SECRET=$(aws ssm get-parameter --name ${APP_SECRET_SSM_ARN} --with-decryption --query Parameter.Value --output text)
      - export GITHUB_TOKEN=$(/bin/bash ${CODEBUILD_SRC_DIR}/deploy_scripts/ci/bin/create_github_token.sh)
      - export REPO_OWNER=$(echo $REPO_FULL_NAME | cut -d '/' -f 1)
      - export REPO_NAME=$(echo $REPO_FULL_NAME | cut -d '/' -f 2)
      - sed -i "s/<OWNER>/$REPO_OWNER/g; s/<NAME>/$REPO_NAME/g" ${CODEBUILD_SRC_DIR}/deploy_scripts/ci/.tfnotify.yml
      - cd ${CODEBUILD_SRC_DIR}
      - terraform fmt -no-color -check -diff -recursive
  build:
    commands:
      - |
        if git --no-pager diff origin/main..HEAD --name-only | grep -E '^env/dev/resource1/'; then
          /bin/bash ${CODEBUILD_SRC_DIR}/deploy_scripts/ci/bin/plan_tfnotify.sh /env/dev/resource1/
        fi
  
      - |
        if git --no-pager diff origin/main..HEAD --name-only | grep -E '^env/dev/resource2/'; then
          /bin/bash ${CODEBUILD_SRC_DIR}/deploy_scripts/ci/bin/plan_tfnotify.sh /env/dev/resource2/
        fi
        
      - |
        if git --no-pager diff origin/main..HEAD --name-only | grep -E '^env/dev/resource3/'; then
          /bin/bash ${CODEBUILD_SRC_DIR}/deploy_scripts/ci/bin/plan_tfnotify.sh /env/dev/resource3/
        fi
  post_build:
    commands:
      - /bin/bash ${CODEBUILD_SRC_DIR}/deploy_scripts/ci/bin/revoke_github_token.sh

CodeBuild の処理自体は、先のシーケンスと同等です。
差分のあったディレクトリの plan 結果のみを通知するように、build ステージで main ブランチとの diff を取ってから、検知したディレクトリのみ Terraform の実行と通知処理を行います。

.tfnotify.yml

GitHub への通知を行うため tfnotify を用います。
通知内容のカスタマイズも可能で、以下のように yaml ファイルへ通知内容を記述し、 CLI 実行時の引数として渡してあげます。
※ <OWNER> と <NAME> は、先の buildspec.yaml の処理 ( 16 – 18 行 ) にて適切なリポジトリ情報で置換されます。

---
ci: codebuild

notifier:
  github:
    token: $GITHUB_TOKEN
    repository:
      owner: "<OWNER>"
      name: "<NAME>"

terraform:
  plan:
    template: |
      {{ .Title }} for {{ .Message }} <sup>[CI link]( {{ .Link }} )</sup>
      {{if .Result}}
      <pre><code> {{ .Result }}
      </pre></code>
      {{end}}
      <details><summary>Details (Click me)</summary>

      <pre><code>
      {{ .Body }}
      </pre></code>
      </details>
    when_add_or_update_only:
      label: "add-or-update"
    when_destroy:
      label: "destroy"
      template: |
        ## :warning: WARNING: Resource Deletion will happen :warning:

        This plan contains **resource deletion**. Please check the plan result very carefully!
    when_plan_error:
      label: "error"

Utility scripts

CLI の導入、Token の発行、通知等々のスクリプトを以下のように用意します。
※ クリックで展開します。

install_terraform.sh
#!/bin/bash

####################################
# This script is used by CodeBuild #
####################################

set -eux

TFVERSION="1.7.3"

git clone https://github.com/tfutils/tfenv.git $HOME/.tfenv
ln -s $HOME/.tfenv/bin/* /usr/local/bin
tfenv install ${TFVERSION} && tfenv use ${TFVERSION}
terraform version
install_tfnotify.sh
#!/bin/bash

####################################
# This script is used by CodeBuild #
####################################

set -eux

TNVERSION="v0.8.0"

wget https://github.com/mercari/tfnotify/releases/download/${TNVERSION}/tfnotify_linux_amd64.tar.gz
tar xzf tfnotify_linux_amd64.tar.gz
cp tfnotify /usr/local/bin/
tfnotify
plan_tfnotify.sh
#!/bin/bash

####################################
# This script is used by CodeBuild #
####################################

set -eux

echo "Run Terraform plan in ${CODEBUILD_SRC_DIR}/${1}/."

cd ${CODEBUILD_SRC_DIR}/${1}/ && \
terraform init && \
terraform plan -no-color | tfnotify --config ${CODEBUILD_SRC_DIR}/deploy_scripts/ci/.tfnotify.yml plan --message "${1}"

echo "Terraform plan executed in ${CODEBUILD_SRC_DIR}/${1}/."
create_github_token.sh
#!/bin/bash

####################################
# This script is used by CodeBuild #
####################################

base64url() {
  openssl enc -base64 -A | tr '+/' '-_' | tr -d '='
}

sign() {
  openssl dgst -binary -sha256 -sign <(printf '%s' "${APP_SECRET}")
}

header="$(printf '{"alg":"RS256","typ":"JWT"}' | base64url)"

now="$(date '+%s')"
iat="$((now - 60))"
exp="$((now + (3 * 60)))"
template='{"iss":"%s","iat":%s,"exp":%s}'
payload="$(printf "${template}" "${APP_ID}" "${iat}" "${exp}" | base64url)"

signature="$(printf '%s' "${header}.${payload}" | sign | base64url)"

jwt="${header}.${payload}.${signature}"

installation_id="$(curl --location --silent --request GET \
  --url "https://api.github.com/repos/${REPO_FULL_NAME}/installation" \
  --header "Accept: application/vnd.github+json" \
  --header "X-GitHub-Api-Version: 2022-11-28" \
  --header "Authorization: Bearer ${jwt}" \
  | jq -r '.id'
)"

token="$(curl --location --silent --request POST \
  --url "https://api.github.com/app/installations/${installation_id}/access_tokens" \
  --header "Accept: application/vnd.github+json" \
  --header "X-GitHub-Api-Version: 2022-11-28" \
  --header "Authorization: Bearer ${jwt}" \
  | jq -r '.token'
)"

echo "${token}"
revoke_github_token.sh
#!/bin/bash

####################################
# This script is used by CodeBuild #
####################################

curl --location --silent --request DELETE \
  --url "https://api.github.com/installation/token" \
  --header "Accept: application/vnd.github+json" \
  --header "X-GitHub-Api-Version: 2022-11-28" \
  --header "Authorization: Bearer ${GITHUB_TOKEN}"

AWS Resources

構成図にある CodeBuild 関連のリソースですが、こちら に Terraform の module を用意しました。
以下のように呼び出すことで必要なリソースがプロビジョニングされます。
※ GitHub App の ID と 秘密鍵 は SSM Parameter Store に SecureString として手動で登録しておき、その ARN を CodeBuild の環境変数 ( APP_ID_SSM_ARN, APP_SECRET_SSM_ARN ) として設定しておきます。
※ クリックで展開します。

呼び出しサンプル
module "cicd_terraform_ci_github" {
  source = "git::https://github.com/snkk1210/tf-m-templates.git//modules/aws/cicd/terraform/ci/github"

  common = {
    "project"      = "sample"
    "environment"  = "sandbox"
    "service_name" = "hcl"
    "type"         = "ci"
  }

  source_info = {
    location        = "https://github.com/<ORGANIZATION_NAME>/<REPOSITORY_NAME>.git"
    git_clone_depth = 1
    buildspec       = "./deploy_scripts/ci/buildspec.yml"
  }

  environment_variable = {
    variables = [
      {
        name  = "APP_ID_SSM_ARN"
        value = "arn:aws:ssm:ap-northeast-1:xxxxxxxxxxxx:parameter/path/to/id"
        type  = "PLAINTEXT"
      },
      {
        name  = "APP_SECRET_SSM_ARN"
        value = "arn:aws:ssm:ap-northeast-1:xxxxxxxxxxxx:parameter/path/to/secret"
        type  = "PLAINTEXT"
      },
      {
        name  = "REPO_FULL_NAME"
        value = "<ORGANIZATION_NAME>/<REPOSITORY_NAME>"
        type  = "PLAINTEXT"
      }
    ]
  }

  filter_groups = [
    {
      event_pattern = "PULL_REQUEST_CREATED"
      file_pattern  = "^env/dev/*"
    },
    {
      event_pattern = "PULL_REQUEST_UPDATED"
      file_pattern  = "^env/dev/*"
    },
    {
      event_pattern = "PULL_REQUEST_REOPENED"
      file_pattern  = "^env/dev/*"
    }
  ]
}

やってみる!!

以下のように /env/dev/resource1 配下のリソースを変更 ( Name タグの更新 ) し、Pull Request を作成します。

diff --git a/env/dev/resource1/vpc.tf b/env/dev/resource1/vpc.tf
index 5360514..415e5ae 100644
--- a/env/dev/resource1/vpc.tf
+++ b/env/dev/resource1/vpc.tf
@@ -2,6 +2,6 @@ resource "aws_vpc" "this" {
   cidr_block = "10.10.0.0/16"

   tags = {
-    Name = "dev-resource1-vpc.0.0.11"
+    Name = "dev-resource1-vpc.0.0.12"
   }
 }

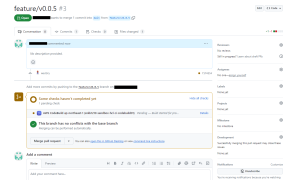
CodeBuild が起動しました!

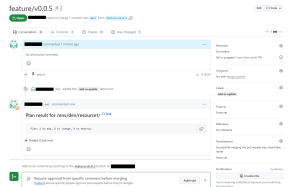
コメントが通知されました!

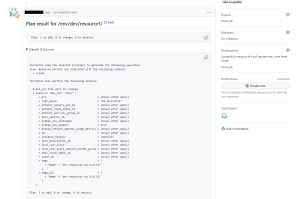
Terraform の実行結果も確認できました!

と、いった形で Terraform の CI 機構が完成しました!

終わりに

当初は GitHub の PAT ( Personal Access Token ) をそのまま使って機構を作ろうとしておりました。
しかし、セキュリティリスクの懸念があるのではないか?との指摘をいただいて、GitHub App から一時トークンを生成して利用する構成に変更した経緯があります。
これも新しい職場に転職したおかげで気づけた事柄ですね!!

これからも新天地で頑張っていきます!!
※ 本当に転職して良かった (歓喜)。

【AWS】SES で受信したメールを Lambda で加工して Slack に通知するパイプラインを Terraform で作る【Python】

こんにちは。
気づくと既に 2023 年も 1/4 が経過しており、時間の進む速度感覚がおかしくなってきた今日この頃でございます。

さて、とある事情から SES receipt rule で受信したメールを加工して Slack に通知させる必要がでてきました。
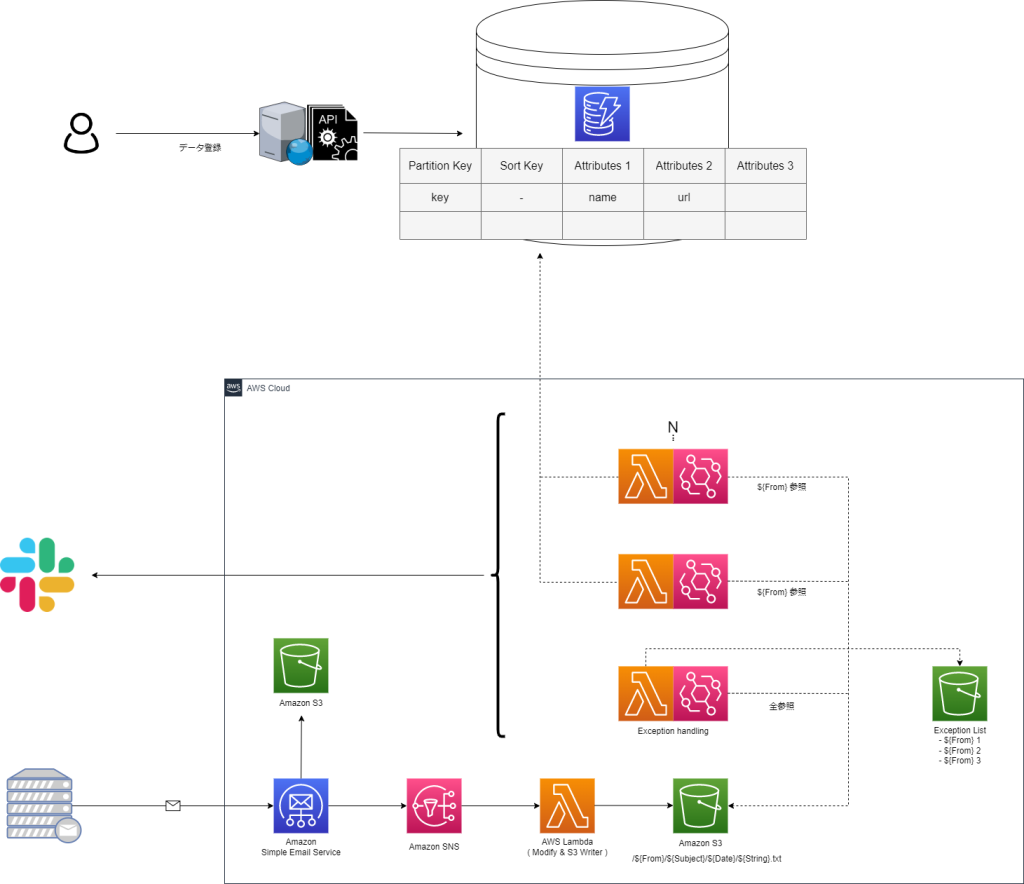
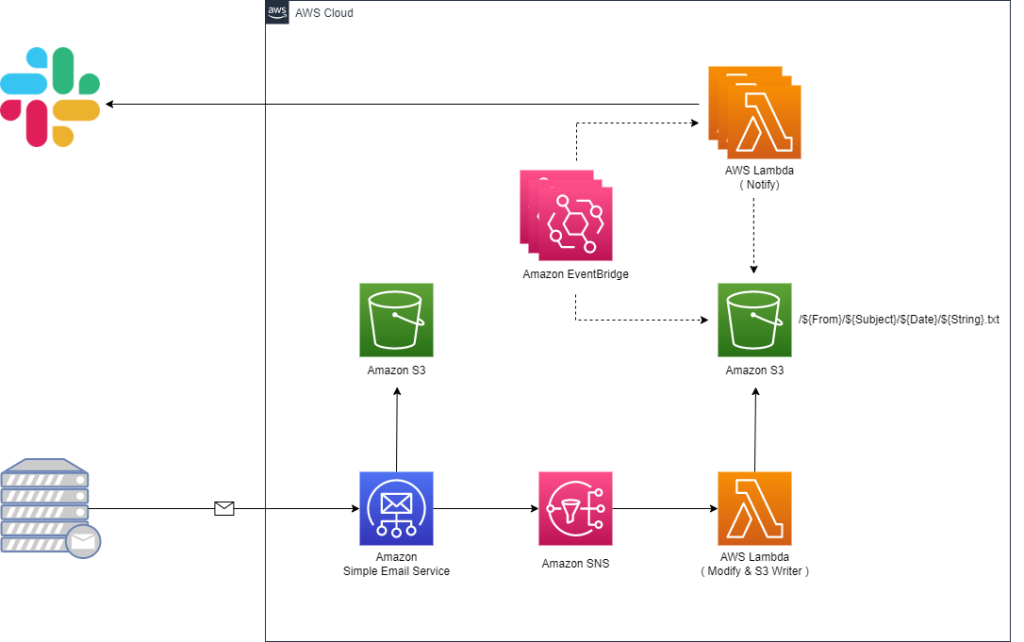
具体的には最終的に下記構成のようなパイプラインを構築しようと考えております。

・メール受信時にメール加工用 Lambda を起動し、データを S3 に格納
・特定の From のメールが S3 に格納されたことをトリガーに通知用 Lambda を起動
・別システムのデータベースから情報を引っ張ってきて Slack へ通知

つきましては、この構成の一部を Terraform で管理してみようと思います。

構成図

今回は SES receipt rule → SNS → Lambda → S3 → EventBridge → Lambda までを一括でデプロイできる HCL を作成します。

HCL

作成したコード一式は こちら になります。

.
├── README.md
├── example-slack-lambda.tf.example
├── modules
│   ├── notifier
│   │   ├── eventbridge.tf
│   │   ├── example
│   │   │   ├── basic
│   │   │   │   ├── lambda
│   │   │   │   │   ├── bin
│   │   │   │   │   └── source
│   │   │   │   │       └── basic.py
│   │   │   │   ├── lambda.tf
│   │   │   │   └── variables.tf
│   │   │   └── slack
│   │   │       ├── lambda
│   │   │       │   ├── bin
│   │   │       │   └── source
│   │   │       │       └── slack.py
│   │   │       ├── lambda.tf
│   │   │       └── variables.tf
│   │   └── variables.tf
│   └── receiver
│       ├── lambda
│       │   ├── bin
│       │   └── source
│       │       └── receiver.py
│       ├── lambda.tf
│       ├── s3-processed.tf
│       ├── s3-receiver.tf
│       ├── ses-receipt-rule.tf
│       ├── sns.tf
│       └── variables.tf
├── notifier.tf.example
└── receiver.tf.example

modules/ 配下に各種リソース定義を配置し、上位からモジュールを読み込む想定です。
※ .example はモジュール読み込み用のテンプレートです。

以降、要所をツラツラと記載させて頂きます。

Lambda ( メール加工 )

SES で受信したメールを加工する Lambda を用意します。
処理の詳細はメールの From、受信日、件名、本文、表示名を抜き出し、S3 に格納する、とします。
S3 に格納する情報は、後に繋ぎやすいように、本文のみのオブジェクトとし、その他の情報はオブジェクトを格納するディレクトリ名として保持させます。

・modules/receiver/lambda/source/receiver.py

import boto3
import json
import logging
import email
import random
import string
import os
import re

logger = logging.getLogger()
logger.setLevel(logging.INFO)

def lambda_handler(event, context):

    logger.info("Event: " + str(event))
    
    message = json.loads(event['Records'][0]['Sns']['Message'])
    m_from = message['mail']['commonHeaders']['from'][0]
    date = message['mail']['commonHeaders']['date']
    subject = message['mail']['commonHeaders']['subject']
    content = message['content']
    email_obj = email.message_from_string(content)

    body = perth_mail_body(email_obj)
    logger.info("Body: " + str(body))

    fname = extract_mail_address(m_from).replace("/","[slash]") + "/" \
        + subject.replace("/","[slash]") \
        + "/" + date.replace("/","[slash]") \
        + "/" + extract_display_name(m_from) + "[dn]" + randomstr(20) + ".txt"
    logger.info("Fname: " + str(fname))

    res = put2s3(body, fname)
    logger.info("Response: " + str(res))

def perth_mail_body(email_obj):
    """
    Retrieve the body part of the mail.

    Parameters
    ----------
    email_obj : object structure

    Returns
    -------
    body : string
        body part of the mail
    """

    body = ""
    for part in email_obj.walk():
        logger.info("maintype: " + part.get_content_maintype())
        if part.get_content_maintype() == 'multipart':
            continue

        attach_fname = part.get_filename()

    if not attach_fname:
        charset = str(part.get_content_charset())
        if charset:
            body += part.get_payload(decode=True).decode(charset, errors="replace")
        else:
            body += part.get_payload(decode=True)
    else:
        logger.info("There is Attach File")
        body += "Error: Attachments are not supported -> " + str(part.get_payload(decode=True))

    return body

def put2s3(body, fname):
    """
    Upload files to S3.

    Parameters
    ----------
    body : string
        File Contents
    fname : string
        File Name ( Path )

    Returns
    -------
    res : dict
        API Return Values
    """

    s3 = boto3.client("s3")

    try:
        res = s3.put_object(
            Bucket=os.environ['s3BucketName'],
            ACL='private',
            Body=body,
            Key=fname,
            ContentType='text/plain'
            )
        logger.info("Success: %s has been written.", fname)
        logger.info("Success: %s", res)
    except Exception as e:
        logger.error("Error: %s", e)
    return res

def randomstr(n):
    """
    Generate a random string.

    Parameters
    ----------
    n : int
        length of a character string
    
    Returns
    -------
        : string
        random string
    """
    return ''.join(random.choices(string.ascii_letters + string.digits, k=n))

def extract_mail_address(m_from):
    """
    Extracting email addresses from a string.

    Parameters
    ----------
    m_from : string
        String containing an email address
    
    Returns
    -------
        : list
        email addresses 
    """
    pattern = r'[a-zA-Z0-9_.+-]+@[a-zA-Z0-9-]+\.[a-zA-Z0-9-.]+'
    return re.findall(pattern, m_from)[0]

def extract_display_name(m_from):
    """    
    Extracting display name from a Mail From.

    Parameters
    ----------
    m_from : string
        String containing an email address
    
    Returns
    -------
        : string
        display name
    """
    delimiter = ' <'

    if delimiter in m_from:
        idx = m_from.find(delimiter)
        logger.info("There is Display Name")
        return m_from[:idx]
    else:
        logger.info("There is no Display Name")
        return "no_display_name"

Lambda ( Slack 通知 )

通知用の Lambda は、特定のディレクトリ名 ( メールの From ) 配下にオブジェクトが作成されたことを EventBridge が検知しキックされる想定です。
つきましては、検知させる From 毎に EventBridge と Lambda の組を用意する可能性があったため、モジュール読み込みの際に複数のリソースの組を定義できるように工夫し、且つ、本リポジトリで管理していない Lambda も参照できる形にしています。

※ notifier_groups にリストとして EventBridge と Lambda の組を渡します。

・notifier.tf.example

module "notifier" {
  source = "./modules/notifier"

  project     = var.project
  environment = var.environment

  notifier_groups = [
    {
      // Unique identifier
      name = "xxxx"
      // Triggering buckets
      bucket_name = "xxxx"
      // Triggering first renovation folder
      prefix = "xxxx"
      // Lambda Arn
      lambda_arn = "xxxx"
      // Lambda Function name
      lambda_function_name = "xxxx"
    },
    {
      name                 = "xxxx"
      bucket_name          = "xxxx"
      prefix               = "xxxx"
      lambda_arn           = "xxxx"
      lambda_function_name = "xxxx"
    },
    {
      name                 = "xxxx"
      bucket_name          = "xxxx"
      prefix               = "xxxx"
      lambda_arn           = "xxxx"
      lambda_function_name = "xxxx"
    }
  ]
}

Slack 通知用の Lambda は EventBridge から渡されたオブジェクトを読み込み、適宜整形して Slack の WebhookURL にリクエストを発行する流れとなります。

From の種類ごとに、異なった処理を行う Lambda 関数を用意する想定なので、1 サンプルとして基本的な Lambda 関数をリポジトリに配置しています。

・modules/notifier/example/slack/lambda/source/slack.py

import boto3
import json
import logging
import os
import re

from base64 import b64decode
from urllib.request import Request, urlopen
from urllib.error import URLError, HTTPError
from urllib.parse import quote

logger = logging.getLogger()
logger.setLevel(logging.INFO)

def lambda_handler(event, context):

    logger.info("Event: " + str(event))

    bucket_name = str(event['detail']['bucket']['name'])
    logger.info("Bucket: " + str(bucket_name))
    object_key = event['detail']['object']['key']
    object_list = event['detail']['object']['key'].split("/")

    for i in object_list:
        logger.info("Object: " + str(i))

    m_from = object_list[0]
    subject = object_list[1]
    date = object_list[2]
    content = read_s3_object(bucket_name, object_key)

    res = notify2slack(m_from, subject, date, content, object_key)

    logger.info("Response: " + str(res))


def read_s3_object(bucket_name, object_key):
    """
    Read files From S3.

    Parameters
    ----------
    bucket_name : string
        Bucket Name
    object_key : string
        File Name ( Path )

    Returns
    -------
    body : dict
        API Return Values
    """

    s3 = boto3.client("s3")

    try:
        res = s3.get_object(
            Bucket=bucket_name,
            Key=object_key
            )
        logger.info("Success: %s", res)
        body = res['Body'].read().decode('utf-8')
    except Exception as e:
        logger.error("Error: %s", e)
    return body

def notify2slack(m_from, subject, date, content, object_key):
    """
    Notify messages to slack.

    Parameters
    ----------
    m_from : string
        Mail From
    subject : string
        Mail Subject
    date : string
        Mail Date
    content : string
        Mail Content
    object_key : string
        File Name ( Path )
        
    Returns
    -------
    res : dict
        API Return Values
    """

    slack_message = {
        "channel": os.environ['channelName'],
        "icon_emoji": ":rotating_light:",
        "attachments": [
            {
                "color": "#FF0000",
                "title": "Email has been received.",
                "text": "<!here> \n *Content* \n ```%s``` \n" % (content),
                "fields": [
                    {
                        "title": "Date",
                        "value": date,
                        "short": True
                    },
                    {
                        "title": "Subject",
                        "value": subject,
                        "short": True
                    },
                    {
                        "title": "From",
                        "value": m_from,
                        "short": True
                    },
                    {
                        "title": "object_key",
                        "value": object_key,
                        "short": True
                    }
                ]

            }
        ]
    }

    req = Request(decrypt_hookurl(os.environ['HookUrl']), json.dumps(slack_message).encode('utf-8'))

    try:
        res = urlopen(req)
        res.read()
        logger.info("Message posted to %s", slack_message['channel'])
    except HTTPError as e:
        logger.error("Request failed: %d %s", e.code, e.reason)
    except URLError as e:
        logger.error("Server connection failed: %s", e.reason)
    return res


def decrypt_hookurl(hookurl):
    """
    Notify messages to slack.

    Parameters
    ----------
    hookurl : string
        WebhookURL that may be encrypted
        
    Returns
    -------
    hookurl : string
        WebhookURL

    decrypted_hookurl : string
        Decrypted WebhookURL
    """

    if  "hooks.slack.com" in hookurl:
        logger.info("HookURL is not Encrypted")
        return hookurl
    else:
        logger.info("HookURL is Encrypted")
        decrypted_hookurl = boto3.client('kms').decrypt(
            CiphertextBlob=b64decode(hookurl),
            EncryptionContext={'LambdaFunctionName': os.environ['AWS_LAMBDA_FUNCTION_NAME']}
        )['Plaintext'].decode('utf-8')
        return decrypted_hookurl

最後に

このブログを始めて、もう少しで 5 年が経過しそうです。
※ IT 業界で働きだしたのが 3 月なので、今月で丁度 5 年になります。
あくまでも自分の備忘録として存在しているサイトですので、稚拙な内容に関しては何卒ご容赦頂けると幸いでございます…。

引き続きどうぞよろしくお願いいたします。(•ᵕᴗᵕ•)

【AWS】ECR 最新イメージの脆弱性スキャン結果を CSV ライクに出力する【Bash】

こんにちは。お久しぶりでございます。
昨年の秋に受験した 情報処理安全確保支援士試験 に合格してたようで大変浮足立っております。
ただ、支援士資格に関してはコストが高額なのもあり、未登録のままにしておこうかと考えている今日この頃でございます。

さて、話は変わりますが Inspector V2 で ECR のイメージを継続的にスキャンしている環境がございまして。
複数の ECR リポジトリに存在する最新イメージにて検知された脆弱性スキャン結果のみを抽出する必要がございまして。
ちょっとしたスクリプトを組む必要が出てきまして。
わりかし今後も似たようなスクリプトを組む気がしているので、自分用のイディオムとして残しておきます。

スクリプト

ロギング ( log.sh ) / credentials ( env.sh ) の処理は別ファイルから読み込む前提とします。
また、対象とする ECR リポジトリに関しても、リスト ( list.sh ) を作成し、外部ファイルから読み込む形とします。
※ list.sh については、引数を渡して ECR リポジトリを出力する処理である前提です。

#!/usr/bin/bash

PWD=`dirname ${0}`

source ${PWD}/../etc/env.sh
. ${PWD}/../lib/log.sh

if [ $# != 1 ]; then
    echo "Error: invalid argument."
    emitLog "Error: invalid argument."
    exit 1
fi

if !(type "aws" > /dev/null 2>&1); then
    echo "Error: aws command is not found."
    emitLog "Error: aws command is not found."
    exit 1
fi

## GET LATEST IMAGE TAG

container_array=($(/bin/bash ${PWD}/../etc/list.sh ${1}))

container_index=0
for i in ${container_array[@]}
do
     tag_array[${container_index}]=`aws ecr describe-images \
          --region ap-northeast-1 \
          --repository-name ${i} \
          --query 'sort_by(imageDetails,& imagePushedAt)[-1]' --output json \
          | jq -r '.imageTags[0]'`

     let container_index++
done

## SHOW SCAN FINDING

tag_index=0
for i in ${tag_array[@]}
do
     echo "/=================================================/"
     aws ecr describe-image-scan-findings \
          --region ap-northeast-1 \
          --repository-name ${container_array[$tag_index]} \
          --image-id imageTag=${i} \
          | jq ".repositoryName, .imageId.imageTag"

     element_num=`aws ecr describe-image-scan-findings \
          --region ap-northeast-1 \
          --repository-name ${container_array[$tag_index]} \
          --image-id imageTag=${i} \
          | jq '.imageScanFindings.enhancedFindings | length'`
     
     element_num=$(($element_num - 1))
     for j in `seq 0 ${element_num}`
     do
          echo "-------------------------------------------------"
          aws ecr describe-image-scan-findings \
               --region ap-northeast-1 \
               --repository-name ${container_array[$tag_index]} \
               --image-id imageTag=${i} \
               | jq -r "[.imageScanFindings.enhancedFindings[$j].packageVulnerabilityDetails.vulnerablePackages[0].name, .imageScanFindings.enhancedFindings[$j].packageVulnerabilityDetails.vulnerabilityId, .imageScanFindings.enhancedFindings[$j].severity, .imageScanFindings.enhancedFindings[$j].score] | @csv"
     done

     let tag_index++     
done

ネストしまくりで可読性がアレですね。
もっと上手な書き方あれば教えてください。

【Terraform】 ECR 拡張スキャン通知用の Lambda をデプロイしてみる

こんにちは。
先日に投稿した 「Inspector V2 の ECR 拡張スキャン結果を Slack に通知する」 ですが、Lambda のみ手動で作成していたので、こちらも Terraform でデプロイできるように実装します。

【Terraform】Inspector V2 の ECR 拡張スキャン結果を Slack に通知する

Terraform

Terraform で Lambda をデプロイするには、予めソースコードを zip 化しておく必要があるようです。
ついては archive_file という Data Source で対応します。
ソースコードの更新も、zip ファイルの hash 値で判断してくれるようで便利ですね。

/** 
# NOTE: Lambda
*/

// Python スクリプト ZIP 化
data "archive_file" "ecr_enhanced_scanning_finding" {
  type        = "zip"
  source_file = "${path.module}/lambda/source/ecr_enhanced_scanning_finding_notice.py"
  output_path = "${path.module}/lambda/bin/ecr_enhanced_scanning_finding_notice.zip"
}

// Lambda 
resource "aws_lambda_function" "ecr_enhanced_scanning_finding" {
  filename                       = data.archive_file.ecr_enhanced_scanning_finding.output_path
  function_name                  = "${var.common.project}-${var.common.environment}-ecr-enhanced-scan-finding-notice-function"
  description                    = "${var.common.project}-${var.common.environment}-ecr-enhanced-scan-finding-notice-function"
  role                           = aws_iam_role.lambda_role.arn
  handler                        = "ecr_enhanced_scanning_finding_notice.lambda_handler"
  source_code_hash               = data.archive_file.ecr_enhanced_scanning_finding.output_base64sha256
  reserved_concurrent_executions = -1
  runtime                        = "python3.7"
  environment {
    variables = {
      channelName         = var.channel_name
      kmsEncryptedHookUrl = var.kms_encrypted_hookurl
    }
  }

  lifecycle {
    ignore_changes = [
      environment
    ]
  }

}

// SNS
resource "aws_lambda_permission" "ecr_enhanced_scanning_finding" {
  statement_id  = "AllowExecutionFromSNS"
  action        = "lambda:InvokeFunction"
  function_name = aws_lambda_function.ecr_enhanced_scanning_finding.function_name
  principal     = "sns.amazonaws.com"
  source_arn    = aws_sns_topic.ecr_enhanced_scanning_finding.arn
}

// SNS Subscription
resource "aws_sns_topic_subscription" "ecr_enhanced_scanning_finding" {
  topic_arn = aws_sns_topic.ecr_enhanced_scanning_finding.arn
  protocol  = "lambda"
  endpoint  = aws_lambda_function.ecr_enhanced_scanning_finding.arn
}

Lambda

Lambda のソースコード ( Python ) は、以下のようなディレクトリ構成で配置します。

.
├── eventbridge.tf
├── lambda
│   ├── bin
│   │   └── ecr_enhanced_scanning_finding_notice.zip
│   └── source
│       └── ecr_enhanced_scanning_finding_notice.py
├── lambda.tf
└── variables.tf

現状、Terraform には環境変数を KMS キーで暗号化する機能が見当たりませんでした。
そのため、手動で暗号化するか、暗号化しないかのどちらでも対応できるように実装しておきます。
import boto3
import json
import logging
import os

from base64 import b64decode
from urllib.request import Request, urlopen
from urllib.error import URLError, HTTPError
from urllib.parse import quote

logger = logging.getLogger()
logger.setLevel(logging.INFO)

def lambda_handler(event, context):

    CHANNEL_NAME = os.environ['channelName']

    if  "hooks.slack.com" in os.environ['kmsEncryptedHookUrl']:
        logger.info("kmsEncryptedHookUrl: " + str(os.environ['kmsEncryptedHookUrl']))
        logger.info("kmsEncryptedHookUrl is not Encrypted")
        UNENCRYPTED_HOOK_URL = os.environ['kmsEncryptedHookUrl']
        HOOK_URL = "https://" + quote(UNENCRYPTED_HOOK_URL)
    else:
        logger.info("kmsEncryptedHookUrl is Encrypted")
        logger.info("kmsEncryptedHookUrl: " + str(os.environ['kmsEncryptedHookUrl']))
        ENCRYPTED_HOOK_URL = os.environ['kmsEncryptedHookUrl']
        HOOK_URL = "https://" + boto3.client('kms').decrypt(
            CiphertextBlob=b64decode(ENCRYPTED_HOOK_URL),
            EncryptionContext={'LambdaFunctionName': os.environ['AWS_LAMBDA_FUNCTION_NAME']}
        )['Plaintext'].decode('utf-8')

    logger.info("Event: " + str(event))
    message = json.loads(event['Records'][0]['Sns']['Message'])
    logger.info("Message: " + str(message))

    resources = message['resources'][0]
    title = message['title']
    severity = message['severity']
    inspector_score = message['inspectorScore']
    source_url = message['sourceUrl']

    # MEMO: <!channel>, <@user_id>
    slack_message = {
        "channel": CHANNEL_NAME,
        "icon_emoji": ":rotating_light:",
        "attachments": [
            {
                "color": "#FF0000",
                "title": "ECR イメージスキャン結果に脆弱性が存在します",
                "title_link": "https://ap-northeast-1.console.aws.amazon.com/ecr/repositories?region=ap-northeast-1",
                "text": "<!here> \n *Resources* : %s \n" % (resources),
                "fields": [
                    {
                        "title": "Title",
                        "value": title,
                        "short": True
                    },
                    {
                        "title": "Severity",
                        "value": severity,
                        "short": True
                    },
                    {
                        "title": "Inspector_score",
                        "value": inspector_score,
                        "short": True
                    },
                    {
                        "title": "Source_url",
                        "value": source_url,
                        "short": True
                    }
                ]

            }
        ]
    }

    logger.info("HOOK_URL: " + str(HOOK_URL))
    logger.info("CHANNEL_NAME: " + str(CHANNEL_NAME))

    req = Request(HOOK_URL, json.dumps(slack_message).encode('utf-8'))

    try:
        response = urlopen(req)
        response.read()
        logger.info("Message posted to %s", slack_message['channel'])
    except HTTPError as e:
        logger.error("Request failed: %d %s", e.code, e.reason)
    except URLError as e:
        logger.error("Server connection failed: %s", e.reason)

Terraform ですが思っていたよりも Lambda 周りのデプロイツールとして優秀なんじゃないかと思いました。
わあい。

【V2V】dd コマンドでデータを丸ごと吸い出して GCP にサーバを移設してみる

こんにちは。
dd コマンドでディスクのデータを丸ごと吸い出して、GCP にサーバ移設を行う方法について検証してみたので備忘録を残しておきます。

前提として、AWS に構築した WEB / DB の仮想サーバ( EC2 )を、GCP に移設してみます。

1. 移設元

事前にデータを吸い出すディスクよりも大きなボリュームを EC2 にアタッチ / マウントしておきます。
あとは dd コマンドで吸い出すだけで OK です。
吸い出したデータは tar.gz で固めておきます。
※ デバイスファイル名は適宜変更してください。

fdisk /dev/xvdf
mkfs -t xfs /dev/xvdf1
mkdir -p /tmp/mnt
mount -t xfs /dev/xvdf1 /tmp/mnt
dd if=/dev/xvda of=/tmp/mnt/disk.raw bs=4M conv=sparse
cd /tmp/mnt
tar --format=oldgnu -Sczf /tmp/mnt/sanuki-source-wd01-compressed-image.tar.gz disk.raw

固めたデータは GCS ( Cloud Storage )にアップロードします。
方法はなんでも大丈夫ですが、gsutil を使うのが一番手っ取り早いかと考えます。
※ バケット名は適宜変更してください。

cd ~
curl https://sdk.cloud.google.com > install.sh
bash install.sh --disable-prompts
./google-cloud-sdk/bin/gcloud init
./google-cloud-sdk/bin/gsutil mb gs://sanuki-v2v-test-bucket01
./google-cloud-sdk/bin/gsutil ls
./google-cloud-sdk/bin/gsutil cp /tmp/mnt/sanuki-source-wd01-compressed-image.tar.gz gs://sanuki-v2v-test-bucket01/

2. 移設先

・Cloud Storage にアップロードしたファイルを元にイメージを作成しておきます。

イメージ > イメージを作成 > ソース : Cloud Storage ファイル > 作成

・作成したイメージから VM を起動します。
※ VM は sanuki-dest-wd01 という名称にしておきます。

VM インスタンス > インスタンスの作成 > ブートディスク : カスタムイメージ から 作成したイメージを選択 > 作成

…が、VM は正常に起動しません。

シリアルコンソールから VM に接続するとレスキューモードになっており、ログを漁ったところ、どうも File System が壊れているようです。

Feb 15 08:41:23 localhost kernel: XFS (sda1): Unmount and run xfs_repair
Feb 15 08:41:23 localhost kernel: XFS (sda1): First 64 bytes of corrupted metada
Feb 15 08:41:23 localhost kernel: ffff96cdf565fe00: 58 41 47 46 00 00 00 01 00 0
Feb 15 08:41:23 localhost kernel: ffff96cdf565fe10: 00 00 00 01 00 00 00 02 00 0
Feb 15 08:41:23 localhost kernel: ffff96cdf565fe20: 00 00 00 01 00 00 00 00 00 0
Feb 15 08:41:23 localhost kernel: ffff96cdf565fe30: 00 00 00 04 00 07 bf 6b 00 0
Feb 15 08:41:23 localhost kernel: XFS (sda1): metadata I/O error: block 0x1bff20
Feb 15 08:41:23 localhost mount[343]: mount: mount /dev/sda1 on /sysroot failed:
Feb 15 08:41:23 localhost systemd[1]: sysroot.mount mount process exited, code=e
Feb 15 08:41:23 localhost systemd[1]: Failed to mount /sysroot.
Feb 15 08:41:23 localhost systemd[1]: Dependency failed for Initrd Root File Sys
Feb 15 08:41:23 localhost systemd[1]: Dependency failed for Reload Configuration
Feb 15 08:41:23 localhost systemd[1]: Job initrd-parse-etc.service/start failed 
Feb 15 08:41:23 localhost systemd[1]: Triggering OnFailure= dependencies of init
Feb 15 08:41:23 localhost systemd[1]: Job initrd-root-fs.target/start failed wit
Feb 15 08:41:23 localhost systemd[1]: Triggering OnFailure= dependencies of init
Feb 15 08:41:23 localhost systemd[1]: Unit sysroot.mount entered failed state

3. 復旧

復旧用 VM を用意して、壊れたブートディスクをセカンダリとしてアタッチしリペアを試みます。

・ディスクだけ残し VM を削除します。

VM インスタンス > sanuki-dest-wd01 > 編集 > ブートディスク : 削除ルール : ディスクを維持 > 保存 > 削除

・リカバリ用の VM を作成して、壊れたディスクをアタッチします。
※ VM は sanuki-recover01 という名称にしておきます。

VM インスタンス > インスタンスの作成 > ブートディスク : 公開イメージ : CentOS7 > 作成

VM インスタンス > sanuki-recover01 > 編集 > 追加ディスク : 既存のディスクを接続 > sanuki-dest-wd01 : 保存 > 保存

・リカバリ用の VM に接続し、File System のリペアを試みます。
先に復旧対象のデバイスファイルを確認しておきます。
今回は /dev/sdb1 が対象になります。

[root@sanuki-recover01 ~]# lsblk
NAME   MAJ:MIN RM  SIZE RO TYPE MOUNTPOINT
sda      8:0    0   20G  0 disk
tqsda1   8:1    0  200M  0 part /boot/efi
mqsda2   8:2    0 19.8G  0 part /
sdb      8:16   0   30G  0 disk
mqsdb1   8:17   0   30G  0 part
[root@sanuki-recover01 ~]# ls -l /dev/disk/by-id/ | grep "sanuki-dest-wd01"
lrwxrwxrwx. 1 root root  9 Feb 15 11:40 google-sanuki-dest-wd01 -> ../../sdb
lrwxrwxrwx. 1 root root 10 Feb 15 11:40 google-sanuki-dest-wd01-part1 -> ../../sdb1
lrwxrwxrwx. 1 root root  9 Feb 15 11:40 scsi-0Google_PersistentDisk_sanuki-dest-wd01 -> ../../sdb
lrwxrwxrwx. 1 root root 10 Feb 15 11:40 scsi-0Google_PersistentDisk_sanuki-dest-wd01-part1 -> ../../sdb1

いきなり xfs_repair を行うと怒られました。
一度 マウント / アンマウント する必要があるようです。

[root@sanuki-recover01 ~]# xfs_repair /dev/sdb1
Phase 1 - find and verify superblock...
        - reporting progress in intervals of 15 minutes
Phase 2 - using internal log
        - zero log...
ERROR: The filesystem has valuable metadata changes in a log which needs to
be replayed.  Mount the filesystem to replay the log, and unmount it before
re-running xfs_repair.  If you are unable to mount the filesystem, then use
the -L option to destroy the log and attempt a repair.
Note that destroying the log may cause corruption -- please attempt a mount
of the filesystem before doing this.

適当にディレクトリを切ってから マウント → アンマウント → xfs_repair を行います。

mkdir /tmp/mnt
mount /dev/sdb1 /tmp/mnt
umount /dev/sdb1
xfs_repair /dev/sdb1

…正常にリペアできました。

[root@sanuki-recover01 ~]# xfs_repair /dev/sdb1
Phase 1 - find and verify superblock...
        - reporting progress in intervals of 15 minutes
Phase 2 - using internal log
        - zero log...
        - scan filesystem freespace and inode maps...
agi unlinked bucket 29 is 23389 in ag 13 (inode=54549341)
        - 11:45:46: scanning filesystem freespace - 16 of 16 allocation groups done
        - found root inode chunk
Phase 3 - for each AG...
        - scan and clear agi unlinked lists...
        - 11:45:46: scanning agi unlinked lists - 16 of 16 allocation groups done
        - process known inodes and perform inode discovery...
        - agno = 15
        - agno = 0
        - agno = 1
        - agno = 2
        - agno = 3
        - agno = 4
        - agno = 5
        - agno = 6
        - agno = 7
        - agno = 8
        - agno = 9
        - agno = 10
        - agno = 11
        - agno = 12
data fork in ino 50509395 claims free block 6314488
data fork in ino 50509395 claims free block 6314489
        - agno = 13
data fork in ino 54549341 claims free block 6818903
data fork in ino 54549341 claims free block 6818904
data fork in ino 54549341 claims free block 6818937
data fork in ino 54549341 claims free block 6818938
        - agno = 14
        - 11:45:47: process known inodes and inode discovery - 103104 of 103104 inodes done
        - process newly discovered inodes...
        - 11:45:47: process newly discovered inodes - 16 of 16 allocation groups done
Phase 4 - check for duplicate blocks...
        - setting up duplicate extent list...
        - 11:45:47: setting up duplicate extent list - 16 of 16 allocation groups done
        - check for inodes claiming duplicate blocks...
        - agno = 0
        - agno = 1
        - agno = 2
        - agno = 3
        - agno = 4
        - agno = 5
        - agno = 6
        - agno = 7
        - agno = 8
        - agno = 9
        - agno = 10
        - agno = 11
        - agno = 12
        - agno = 13
        - agno = 14
        - agno = 15
        - 11:45:47: check for inodes claiming duplicate blocks - 103104 of 103104 inodes done
Phase 5 - rebuild AG headers and trees...
        - 11:45:47: rebuild AG headers and trees - 16 of 16 allocation groups done
        - reset superblock...
Phase 6 - check inode connectivity...
        - resetting contents of realtime bitmap and summary inodes
        - traversing filesystem ...
        - traversal finished ...
        - moving disconnected inodes to lost+found ...
disconnected inode 54549341, moving to lost+found
Phase 7 - verify and correct link counts...
        - 11:45:47: verify and correct link counts - 16 of 16 allocation groups done
done

・リカバリ用 VM からディスクをデタッチします。

VM インスタンス > sanuki-recover01 > 編集 > 追加ディスク : 既存のディスク > sanuki-dest-wd01 : デタッチ > 保存

・リペアしたディスクからもう一度 VM を起動します。

VM インスタンス > インスタンスの作成 > ブートディスク : 既存のディスク : sanuki-dest-wd01 : 選択 > 作成

コンソールに接続します。
…接続できました。

serialport: Connected to fleet-acumen-286514.asia-northeast1-b.sanuki-dest-wd01 
port 1 (session ID: 99e0fefe92785865dd201bdc6865a89ae461aa77, active connections
: 1).
[   31.822303] APL|18307:18410:transport.c:1112:transport_device_release| INFO: 
detaching interceptors
[   31.838278] APL|18307:18410:tracepoints.c:99:tracepoints_detach| INFO: tracep
oints detached
[   31.847363] APL|18307:18410:syscall_common.c:149:detach_hooks| INFO: detachin
g syscall hooks...
[   31.856628] APL|18307:18410:syscall_common.c:186:detach_hooks| INFO: syscall 
hooks detached
[   31.865252] APL|18307:18410:syscall_common.c:213:syscall_hooks_detach| INFO: 
module_refcount()=1
[   31.874511] APL|18307:18410:transport.c:1117:transport_device_release| INFO: 
interceptors detached
[   32.305021] snapapi_init(modprobe,18440): Snapapi(v.0.8.8) init OK. Session s
ize 13784. Em size 990. Ctl major 245
[   32.351295] device-mapper: uevent: version 1.0.3
[   32.356843] device-mapper: ioctl: 4.37.1-ioctl (2018-04-03) initialised: dm-d
evel@redhat.com
[   32.390383] BIOS EDD facility v0.16 2004-Jun-25, 1 devices found
CentOS Linux 7 (Core)
Kernel 3.10.0-1062.12.1.el7.x86_64 on an x86_64

sanuki-dest-wd01 login: root
Password: 
Last login: Tue Feb 15 07:57:24 on pts/0
[root@sanuki-dest-wd01 ~]#

4. 終わりに

色々と躓きましたが、サーバの移設自体は可能なようです。
移設元が稼働していてデータの差分等が発生するのであれば、適宜 rsync 等でデータを同期してあげればよいですね。
一から移設先のサーバを作ってデータを同期するよりもお手軽かもしれません。

SAM + dynamodb-local でローカルにサーバレス開発環境を作って遊んでみる

こんにちは。
最近、DynamoDB について触る機会があったので、少し勉強してみようかな、と。
調べてみると ローカルに DynamoDB を立てることができる dynamodb-local というものがあるそうです。
SAM と dynamodb-local を使ってローカルにサーバレス開発環境を作り、簡単な掲示板を作成してみようと思います。

構成

JavaScript:クライアント
SAM ( ApiGateWay / Lambda ) : バックエンド API
dynamodb-local:データストア
サーバ IP:192.168.33.55

よくあるタイプのやつですね。
SAM ( ApiGateWay / Lambda ) でデータ取得 / データ登録 の REST API を作って、 JavaScript で操作、データは dynamodb-local に保存します。

環境構築

dynamodb-local は Docker のイメージが公開されています。
CentOS7 に SAM と dynamodb-local をセットアップする Ansible の role を こちら に用意しました。

環境構築後は、事前に dynamodb-local にテーブルを作成しておきます。

# テーブル作成
aws dynamodb create-table --table-name 'bbs' \
--attribute-definitions '[{"AttributeName":"postId","AttributeType": "S"}]' \
--key-schema '[{"AttributeName":"postId","KeyType": "HASH"}]' \
--provisioned-throughput '{"ReadCapacityUnits": 5,"WriteCapacityUnits": 5}' \
--endpoint-url http://localhost:8000

バックエンド API

データ取得 / データ登録 の API を Python で作成します。
ディレクトリ構成は下記の通りです。

.
├── bbs
│ ├── create
│ │ └── app.py
│ └── read
│   └── app.py
├── template.yaml
└── vars.json

・データ取得 API ( ./bbs/read/app.py )

import json
import boto3
import time
import logging
import os
from botocore.exceptions import ClientError

logger = logging.getLogger()
logger.setLevel(logging.INFO)

def lambda_handler(event, context):

    logger.info("Event: " + str(event))

    responseHeaders = {
      "Access-Control-Allow-Methods": "OPTIONS,GET",
      "Access-Control-Allow-Headers" : "*",
      "Access-Control-Allow-Origin": "*"
    }

    try:
        table = _get_database().Table('bbs')
        res = table.scan()
    except ClientError as e:
        logger.error("Error: %s", e)

    return {
        "headers": responseHeaders,
        "statusCode": 200,
        "body":  json.dumps(res['Items'], default=decimal_default_proc),
    }

def decimal_default_proc(obj):
    from decimal import Decimal
    if isinstance(obj, Decimal):
        return float(obj)
    raise TypeError

def _get_database():
    if (os.environ["DYNAMO_ENDPOINT"] == ""):
        endpoint = boto3.resource('dynamodb')
    else:
        endpoint = boto3.resource('dynamodb', endpoint_url=os.environ["DYNAMO_ENDPOINT"])
    return endpoint

・データ登録 API ( ./bbs/create/app.py )

import json
import boto3
import time
import datetime
import logging
import uuid
import os
from boto3.dynamodb.conditions import Key, Attr
from botocore.exceptions import ClientError

logger = logging.getLogger()
logger.setLevel(logging.INFO)

def lambda_handler(event, context):

    logger.info("Event: " + str(event))

    responseHeaders = {
      "Access-Control-Allow-Methods": "OPTIONS,GET,POST",
      "Access-Control-Allow-Headers" : "*",
      "Access-Control-Allow-Origin": "*"
    }

    req = json.loads(event['body'])

    item = {
        'postId': str(uuid.uuid4()),
        'time': str(datetime.datetime.now()),
        'owner': req['owner'],
        'note': req['note'],
        'enable': bool('True')
    }

    logger.info("Item: " + str(item))

    try:
        table = _get_database().Table('bbs')
        res = table.put_item(Item=item)
        logger.info("Respons: " + str(res))
    except ClientError as e:
        logger.error("Error: %s", e)

    return {
        "headers": responseHeaders,
        "statusCode": 200,
        "body": item,
    }

def _get_database():
    if (os.environ["DYNAMO_ENDPOINT"] == ""):
        endpoint = boto3.resource('dynamodb')
    else:
        endpoint = boto3.resource('dynamodb', endpoint_url=os.environ["DYNAMO_ENDPOINT"])
    return endpoint

・環境変数定義ファイル : DynamoDB への接続先エンドポイント ( ./vars.json )

{
    "Parameters": {
      "DYNAMO_ENDPOINT": "http://192.168.33.55:8000"
    }
}

・SAM の template ファイル : API の仕様やその他諸々 ( ./template.yaml )

AWSTemplateFormatVersion: '2010-09-09'
Transform: AWS::Serverless-2016-10-31
Description: BBS

Globals:
  Function:
    Timeout: 3
    Environment:
      Variables:
        DYNAMO_ENDPOINT: DYNAMO_ENDPOINT
  Api:
    Cors:
      AllowMethods: "'OPTIONS,GET,POST'"
      AllowHeaders: "'*'"
      AllowOrigin: "'*'"

Resources:
  ReadBBSFunction:
    Type: AWS::Serverless::Function
    Properties:
      CodeUri: bbs/read/
      Handler: app.lambda_handler
      Runtime: python3.9
      Events:
        ReadBBS:
          Type: Api
          Properties:
            Path: /bbs/
            Method: get

  CreateBBSFunction:
    Type: AWS::Serverless::Function
    Properties:
      CodeUri: bbs/create/
      Handler: app.lambda_handler
      Runtime: python3.9
      Events:
        CreateBBS:
          Type: Api
          Properties:
            Path: /bbs/
            Method: post

API の起動

コードをビルドして API を起動します。
※ デフォルトは 3000 ポートで立ち上がります。

sam build
sam local start-api --env-vars vars.json --host 0.0.0.0

curl で API を叩いてエラー無くレスポンスが返ってくれば OK です。
※ 初回リクエスト時にイメージがビルドされるようで、その際レスポンスが少々遅延するようです。
$ curl http://192.168.33.55:3000/bbs
[]

クライアント

Ajax でデータ取得 API を叩いて投稿情報を取得し、一覧を表示します。
併せてデータ登録 API に投稿を POST して登録を行います。

<!DOCTYPE html>
<html>
    <head>
        <meta charset="utf-8">
        <title>bbs</title>
    </head>
    <body>
        <dl id="wrap">
            <script src="https://ajax.googleapis.com/ajax/libs/jquery/2.2.4/jquery.min.js"></script>
            <script type="text/javascript">
            const url = "http://192.168.33.55:3000/bbs";
              $(function(){
                $.getJSON(url, function(note_list){
                  note_list.sort(function(a, b){
                    if (a.time < b.time){
                      return -1;
                    }else{
                      return 1;
                    }
                  });
                  for(var i in note_list){
                    var h = '<dt>'
                          + note_list[i].time
                          + " "
                          + note_list[i].owner
                          + '</dt>'
                          + '<dd>'
                          + note_list[i].note
                          + '</dd>';
                    $("dl#wrap").append(h);
                  }
                });
              });
            </script>
          </dl>
          <p>投稿者: <input type="text" id="owner" size="30"></p>
          <p>NOTE: <input type="text" id="note" size="30"></p>
          <p><button id="button" type="button">投稿</button></p>
          <script type="text/javascript">
            $(function(){
                $("#response").html("Response Values");
        
                $("#button").click( function(){
                    var url = "http://192.168.33.55:3000/bbs";
                        var JSONdata = {
                            "owner": String($("#owner").val()) ,
                            "note": String($("#note").val())     
                        };
        
                    $.ajax({
                        type : 'post',
                        url : url,
                        data : JSON.stringify(JSONdata),
                        contentType: 'application/json',
                        dataType : 'json',
                        scriptCharset: 'utf-8',
                        success : function(time){
                          window.location.reload();
                        },
                        error : function(time){
                          window.location.reload();
                        }
                    });
                })
            })
        </script>
    </body>
</html>

【jq】AWS WAF で Block されたリクエストの一覧を CSV に整形して出力してみる

こんにちは。
AWS WAF により Block されたリクエストの一覧を月一でリスト化する必要がございました。
最初は API を叩いて Sample request を取得し、その後にログ解析を行おうと思ったのですが、どうも、この API には 5000req/3h の制限があるようで断念…。
調べてみると Kinesis Firehose を経由して S3 に JSON 形式で WAF のログを出力できるようです。
ついては出力された S3 のログを引っ張って jq でリスト化すればいいや、となりました。

シェルスクリプト

cron で月末にスクリプトが実行されるよう設定しておけば、あとは放置で OK ですね。

#!/bin/bash

WORK_DIR=""
THIS_YEAR=`date "+%Y"`
THIS_MONTH=`date "+%m"`
S3_BUCKET=""
PROFILE=""
OUTPUTDIR=""
OUTPUT=${OUTPUTDIR}block_requests-`date +'%FT%R'`.csv

# 作業ディレクトリの作成
mkdir -p ${WORK_DIR}/${THIS_YEAR}/${THIS_MONTH}

# S3 からログのダウンロード
aws s3 cp s3://${S3_BUCKET}/${THIS_YEAR}/${THIS_MONTH}/ ${WORK_DIR}/${THIS_YEAR}/${THIS_MONTH} --recursive --profile=${PROFILE}

# csv のフィールド名を出力
echo "Request.ClientIP,TerminatingRuleId,Request.Country,Request.URI,Request.httpVersion,Request.Method,Other" >> ${OUTPUT}

# ログの一覧を取得
SERCH_FILES=`find ${WORK_DIR}/${THIS_YEAR}/${THIS_MONTH} -type f -name aws-waf-logs*`

for SERCH_FILE in ${SERCH_FILES}
do
    # json -> csv の変換 / パース / 出力
    cat ${SERCH_FILE} | jq -r ' select( .action == "BLOCK") | [.httpRequest.clientIp, .terminatingRuleId, .httpRequest.country, .httpRequest.uri, .httpRequest.httpVersion, .httpRequest.httpMethod, "#HeadersName", .httpRequest.headers[].name, "#HeadersValue",.httpRequest.headers[].value, "#RuleGroup", .ruleGroupList[].ruleGroupId, "#RuleMatch", .ruleGroupList[].terminatingRule.ruleId, "#RuleAction", .ruleGroupList[].terminatingRule.action] |@csv' \
    >> ${OUTPUT}
done

jq って便利ですね。

【サーバレス】Lambda + API Gateway + Flask で Web ツールを作ってみる【AWS】

こんにちは。
仕事でサーバレス環境を扱うことがありまして、勉強がてら少し触ってみようと思ったんですね。
先日に SSL/TLS 証明書の整合性チェックツールを Flask で作ったんで、こちらをサーバレス環境で動かしてみます。
https://github.com/keisukesanuki/certificate_verify_flask_lambda

zappa

コードのデプロイ用に zappa というツールがあるそうです。。
下記手順で簡単に Lambda + API Gateway の環境構築とアプリケーションのデプロイが完了するようです。

# 必要なパッケージの導入
yum groupinstall "Development tools" -y
yum install zlib-devel openssl-devel sqlite-devel -y

# pyenvの導入
git clone https://github.com/pyenv/pyenv.git ~/.pyenv
echo 'export PATH="$HOME/.pyenv/bin:$PATH"' >> ~/.bash_profile
echo 'eval "$(pyenv init -)"' >> ~/.bash_profile
source ~/.bash_profile

# pyenv-virtualenvの導入
git clone https://github.com/yyuu/pyenv-virtualenv.git ~/.pyenv/plugins/pyenv-virtualenv
echo 'eval "$(pyenv virtualenv-init -)"' >> ~/.bash_profile
exec $SHELL -l

# 3.6系のpythonを導入
pyenv install 3.6.5
pyenv global 3.6.5

# awscliの導入/設定
pip install -U pip
pip install awscli
aws configure

# ソースの取得
pyenv virtualenv 3.6.5 lambda
git clone https://github.com/keisukesanuki/certificate_verify_flask_lambda.git 
cd certificate_verify_flask_lambda
pyenv local lambda

# モジュールの導入
pip install -U pip
pip install flask
pip install zappa

# lambdaにデプロイ
zappa init
===========================================================================
What do you want to call this environment (default 'dev'): certificateCheck
===========================================================================
zappa deploy

【Lambda】CloudWatch の通知を Lambda で Chatwork に飛ばしてみる【Python】

こんにちは。
表題の通り、CloudWatch の Alarm 通知を Chatwork に通知してみます。
ランタイムは前回と同じく python 3.7 です。
ROOMNO にメッセージを通知するルームナンバ、 TOKEN に ChatWorkToken を定義すれば動きます。

import boto3
import json
import logging
import os
import urllib
 
from base64 import b64decode
from urllib.request import Request, urlopen
from urllib.error import URLError, HTTPError

# Chatwork のルームナンバ定義
ROOMNO = 'xxxxxxxxxxxxxxxx'
 
# WEB_HOOKURL
URL = f'https://api.chatwork.com/v2/rooms/{ROOMNO}/messages'

# ChatWorkToken 定義
TOKEN = 'xxxxxxxxxxxxxxxxxxxxxxxxxxxxxxxx'

logger = logging.getLogger()
logger.setLevel(logging.INFO)
 
 
def lambda_handler(event, context):
    logger.info("Event: " + str(event))

    # メッセージ取得
    message = json.loads(event['Records'][0]['Sns']['Message'])
    logger.info("Message: " + str(message))
 
    alarm_name = message['AlarmName']
    new_state = message['NewStateValue']
    reason = message['NewStateReason']

    # ヘッダ情報
    headers = {
        'X-ChatWorkToken': TOKEN,
    }  
 
    # 通知内容
    sns_message = {
        'body': "%s state is now %s: %s" % (alarm_name, new_state, reason),
    }
    
    # エンコード
    msns_message = urllib.parse.urlencode(sns_message)
    msns_message = msns_message.encode('utf-8') 
    
    # リクエスト発行
    req = Request(URL, data=msns_message, headers=headers)
    with urlopen(req) as res:
        result = json.loads(res.read().decode("utf-8"))

【Ansible】Ansible で AWS の3層ネットワークを構築する【IaC】

こんにちは。
表題の通り AWS の 3層ネットワークを構築する playbook を用意してみます。
※ 詳細は README を参照ください。
https://github.com/keisukesanuki/aws-vpc-3layer

作るもの

・VPC
・SUBNET
・INTERNETGATEWAY
・NATGATEWAY
・ROUTETABLE

ディレクトリ構造

.
├── README.md
├── ansible.cfg
├── hosts
├── roles
│   └── aws_vpc
│       ├── tasks
│       │   └── main.yml
│       └── vars
│           └── main.yml
└── vpc_create.yml

playbook

---
# tasks file for aws_vpc
- name: create_vpc
  ec2_vpc_net:
    name: "{{ vpc_name }}"
    cidr_block: "{{ vpc_cidr }}"
    region: "{{ region }}"
    profile: "{{ profile }}"
    dns_hostnames: yes
    dns_support: yes
  register: vpc_info

# PUBLIC_SUBNET 作成
- name: create_public_subnet
  ec2_vpc_subnet:
    vpc_id: "{{ vpc_info.vpc.id }}"
    cidr: "{{ item.pub_subnet_cidr }}"
    az: "{{ item.subnet_az }}"
    region: "{{ region }}"
    resource_tags: { "Name":"{{ item.pub_subnet_name }}" }
    profile: "{{ profile }}"
  register: pubsub_info
  with_items:
    - "{{ pub_subnet }}"

# DMZ_SUBNET 作成
- name: create_dmz_subnet
  ec2_vpc_subnet:
    vpc_id: "{{ vpc_info.vpc.id }}"
    cidr: "{{ item.dmz_subnet_cidr }}"
    az: "{{ item.subnet_az }}"
    region: "{{ region }}"
    resource_tags: { "Name":"{{ item.dmz_subnet_name }}" }
    profile: "{{ profile }}"
  register: pubsub_info
  with_items:
    - "{{ dmz_subnet }}"

# PRIVATE_SUBNET 作成
- name: create_private_subnet
  ec2_vpc_subnet:
    vpc_id: "{{ vpc_info.vpc.id }}"
    cidr: "{{ item.pri_subnet_cidr }}"
    az: "{{ item.subnet_az }}"
    region: "{{ region }}"
    resource_tags: { "Name":"{{ item.pri_subnet_name }}" }
    profile: "{{ profile }}"
  register: prisub_info
  with_items:
    - "{{ pri_subnet }}"

# IGW 作成
- name: create_igw
  ec2_vpc_igw:
    vpc_id: "{{ vpc_info.vpc.id }}"
    region: "{{ region }}"
    tags: { "Name":"{{ igw_name }}" }
    profile: "{{ profile }}"
  register: igw_info

# ROUTETABLE 作成(IGW)
- name: create_route_table
  ec2_vpc_route_table:
    vpc_id: "{{ vpc_info.vpc.id }}"
    subnets: "{{ atache_igw_subnet }}"
    routes:
      - dest: 0.0.0.0/0
        gateway_id: "{{ igw_info.gateway_id }}"
    region: "{{ region }}"
    profile: "{{ profile }}"
    resource_tags: { "Name":"{{ rttable_pub_name }}" }

# NGW の ID を取得
- name: get_subnet_id
  shell: aws ec2 describe-subnets --region {{ region }} --profile {{ profile }} --output text | grep -B 1 {{ ngw_subnet_name }} | awk 'NR==1 {print $12}'
  register: ngw_subnet_id

#- name: show
#  debug:
#    msg: "{{ ngw_subnet_id.stdout }}"

# NGW 作成
- name: create_ngw
  ec2_vpc_nat_gateway:
    subnet_id: "{{ ngw_subnet_id.stdout }}"
    region: "{{ region }}"
    profile: "{{ profile }}"
  register: ngw_info

#- name: show
#  debug:
#    msg: "{{ ngw_info.nat_gateway_id }}"

# NGW 作成まで待つ
- name: wait_for_ngw
  pause:
    minutes: 5

# ROUTETABLEの作成(NGW)
- name: create_route_table2
  ec2_vpc_route_table:
    vpc_id: "{{ vpc_info.vpc.id }}"
    subnets: "{{ atache_ngw_subnet }}"
    routes:
      - dest: 0.0.0.0/0
        gateway_id: "{{ ngw_info.nat_gateway_id }}"
    region: "{{ region }}"
    profile: "{{ profile }}"
    resource_tags: { "Name":"{{ rttable_dmz_name }}" }

NATGATEWAY の ID が上手く取得できなかったので awscli の結果をパースして ngw_subnet_id に渡しています。

変数定義

---
# vars file for aws_vpc

# REGION
  region: "ap-northeast-1"

# PROFILE
  profile: "default"

# VPC
  vpc_name: "sanuki-wd-vpc2"
  vpc_cidr: "10.10.0.0/16"

# IGW
  igw_name: "sanuki-igw2"

# NGW
  ngw_name: "sanuki-ngw2"


# NGWを作成するサブネット名
  ngw_subnet_name: "sanuki-wd-public-subnet2-a"

# ROUTETABLE(PUBLIC)
  rttable_pub_name: "sanuki-pub-rt2"

# ROUTETABLE(DMZ)
  rttable_dmz_name: "sanuki-dmz-rt2"

# PUBLIC_SUBNET
  pub_subnet:
    - { pub_subnet_cidr: "10.10.10.0/24" ,subnet_az: "ap-northeast-1a" ,pub_subnet_name: "sanuki-wd-public-subnet2-a" }
    - { pub_subnet_cidr: "10.10.20.0/24" ,subnet_az: "ap-northeast-1c" ,pub_subnet_name: "sanuki-wd-public-subnet2-c" }


# DMZ_SUBNET
  dmz_subnet:
    - { dmz_subnet_cidr: "10.10.30.0/24" ,subnet_az: "ap-northeast-1a" ,dmz_subnet_name: "sanuki-wd-dmz-subnet2-a" }
    - { dmz_subnet_cidr: "10.10.40.0/24" ,subnet_az: "ap-northeast-1c" ,dmz_subnet_name: "sanuki-wd-dmz-subnet2-c" }


# PRIVATE_SUBNET
  pri_subnet:
    - { pri_subnet_cidr: "10.10.50.0/24" ,subnet_az: "ap-northeast-1a" ,pri_subnet_name: "sanuki-wd-private-subnet2-a" }
    - { pri_subnet_cidr: "10.10.60.0/24" ,subnet_az: "ap-northeast-1c" ,pri_subnet_name: "sanuki-wd-private-subnet2-c" }

# IGWに紐付けるサブネット
  atache_igw_subnet:
    - "10.10.10.0/24"
    - "10.10.20.0/24"

# NGWに紐付けるサブネット
  atache_ngw_subnet:
    - "10.10.30.0/24"
    - "10.10.40.0/24"

NatGateway が片方の AZ にしかないため、冗長性の観点からは ? となりますが、まぁいいでしょう。

↓ 2層の playbook はこちら

【Ansible】AnsibleでAWSのネットワークを構築する【IaC】