【AWS】SES で受信したメールを Lambda で加工して Slack に通知するパイプラインを Terraform で作る【Python】

こんにちは。
気づくと既に 2023 年も 1/4 が経過しており、時間の進む速度感覚がおかしくなってきた今日この頃でございます。

さて、とある事情から SES receipt rule で受信したメールを加工して Slack に通知させる必要がでてきました。
具体的には最終的に下記構成のようなパイプラインを構築しようと考えております。

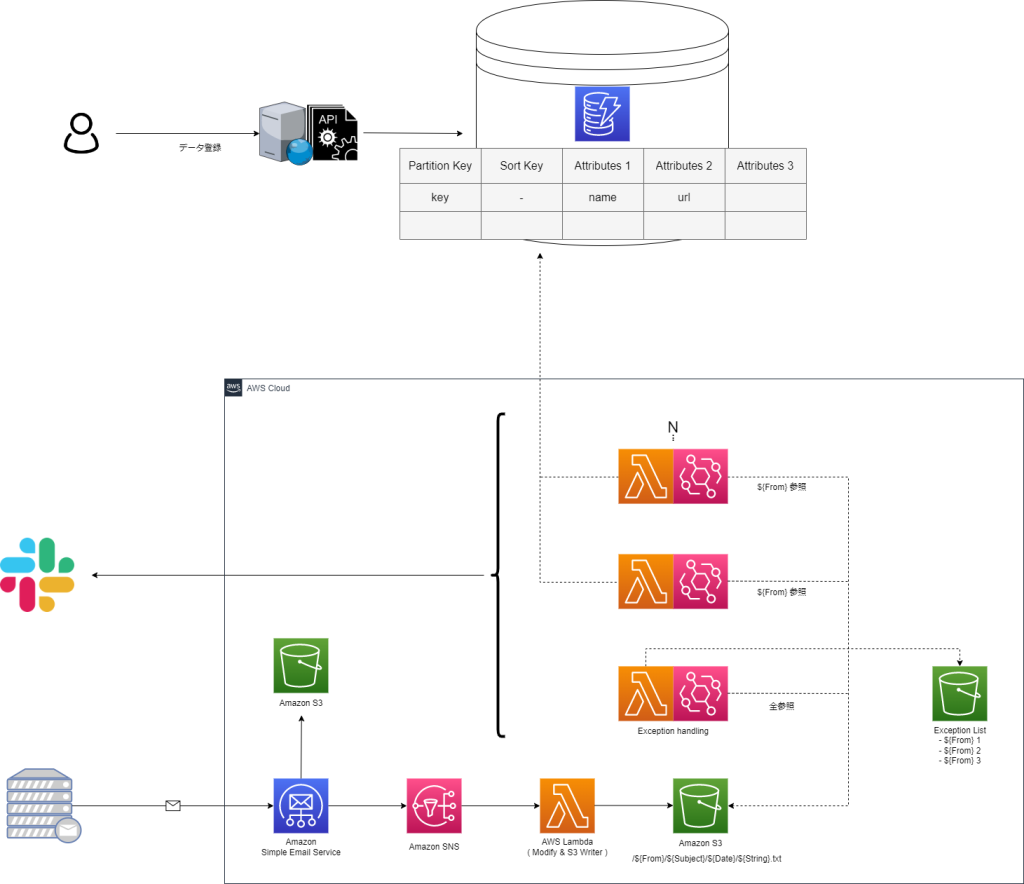
・メール受信時にメール加工用 Lambda を起動し、データを S3 に格納
・特定の From のメールが S3 に格納されたことをトリガーに通知用 Lambda を起動
・別システムのデータベースから情報を引っ張ってきて Slack へ通知

つきましては、この構成の一部を Terraform で管理してみようと思います。

構成図

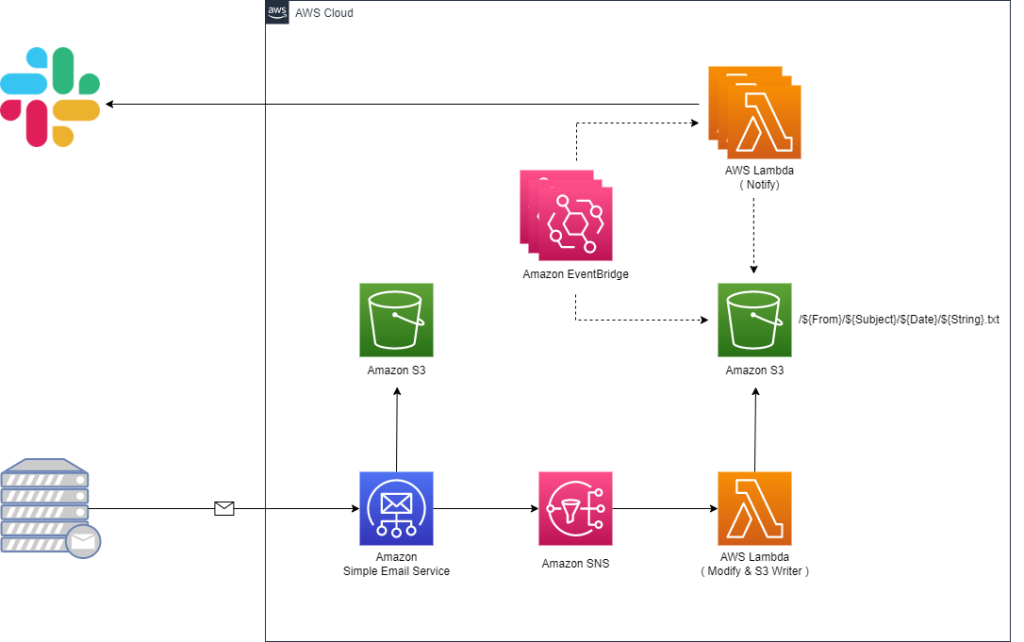
今回は SES receipt rule → SNS → Lambda → S3 → EventBridge → Lambda までを一括でデプロイできる HCL を作成します。

HCL

作成したコード一式は こちら になります。

.
├── README.md
├── example-slack-lambda.tf.example
├── modules
│   ├── notifier
│   │   ├── eventbridge.tf
│   │   ├── example
│   │   │   ├── basic
│   │   │   │   ├── lambda
│   │   │   │   │   ├── bin
│   │   │   │   │   └── source
│   │   │   │   │       └── basic.py
│   │   │   │   ├── lambda.tf
│   │   │   │   └── variables.tf
│   │   │   └── slack
│   │   │       ├── lambda
│   │   │       │   ├── bin
│   │   │       │   └── source
│   │   │       │       └── slack.py
│   │   │       ├── lambda.tf
│   │   │       └── variables.tf
│   │   └── variables.tf
│   └── receiver
│       ├── lambda
│       │   ├── bin
│       │   └── source
│       │       └── receiver.py
│       ├── lambda.tf
│       ├── s3-processed.tf
│       ├── s3-receiver.tf
│       ├── ses-receipt-rule.tf
│       ├── sns.tf
│       └── variables.tf
├── notifier.tf.example
└── receiver.tf.example

modules/ 配下に各種リソース定義を配置し、上位からモジュールを読み込む想定です。
※ .example はモジュール読み込み用のテンプレートです。

以降、要所をツラツラと記載させて頂きます。

Lambda ( メール加工 )

SES で受信したメールを加工する Lambda を用意します。
処理の詳細はメールの From、受信日、件名、本文、表示名を抜き出し、S3 に格納する、とします。
S3 に格納する情報は、後に繋ぎやすいように、本文のみのオブジェクトとし、その他の情報はオブジェクトを格納するディレクトリ名として保持させます。

・modules/receiver/lambda/source/receiver.py

import boto3
import json
import logging
import email
import random
import string
import os
import re

logger = logging.getLogger()
logger.setLevel(logging.INFO)

def lambda_handler(event, context):

    logger.info("Event: " + str(event))
    
    message = json.loads(event['Records'][0]['Sns']['Message'])
    m_from = message['mail']['commonHeaders']['from'][0]
    date = message['mail']['commonHeaders']['date']
    subject = message['mail']['commonHeaders']['subject']
    content = message['content']
    email_obj = email.message_from_string(content)

    body = perth_mail_body(email_obj)
    logger.info("Body: " + str(body))

    fname = extract_mail_address(m_from).replace("/","[slash]") + "/" \
        + subject.replace("/","[slash]") \
        + "/" + date.replace("/","[slash]") \
        + "/" + extract_display_name(m_from) + "[dn]" + randomstr(20) + ".txt"
    logger.info("Fname: " + str(fname))

    res = put2s3(body, fname)
    logger.info("Response: " + str(res))

def perth_mail_body(email_obj):
    """
    Retrieve the body part of the mail.

    Parameters
    ----------
    email_obj : object structure

    Returns
    -------
    body : string
        body part of the mail
    """

    body = ""
    for part in email_obj.walk():
        logger.info("maintype: " + part.get_content_maintype())
        if part.get_content_maintype() == 'multipart':
            continue

        attach_fname = part.get_filename()

    if not attach_fname:
        charset = str(part.get_content_charset())
        if charset:
            body += part.get_payload(decode=True).decode(charset, errors="replace")
        else:
            body += part.get_payload(decode=True)
    else:
        logger.info("There is Attach File")
        body += "Error: Attachments are not supported -> " + str(part.get_payload(decode=True))

    return body

def put2s3(body, fname):
    """
    Upload files to S3.

    Parameters
    ----------
    body : string
        File Contents
    fname : string
        File Name ( Path )

    Returns
    -------
    res : dict
        API Return Values
    """

    s3 = boto3.client("s3")

    try:
        res = s3.put_object(
            Bucket=os.environ['s3BucketName'],
            ACL='private',
            Body=body,
            Key=fname,
            ContentType='text/plain'
            )
        logger.info("Success: %s has been written.", fname)
        logger.info("Success: %s", res)
    except Exception as e:
        logger.error("Error: %s", e)
    return res

def randomstr(n):
    """
    Generate a random string.

    Parameters
    ----------
    n : int
        length of a character string
    
    Returns
    -------
        : string
        random string
    """
    return ''.join(random.choices(string.ascii_letters + string.digits, k=n))

def extract_mail_address(m_from):
    """
    Extracting email addresses from a string.

    Parameters
    ----------
    m_from : string
        String containing an email address
    
    Returns
    -------
        : list
        email addresses 
    """
    pattern = r'[a-zA-Z0-9_.+-]+@[a-zA-Z0-9-]+\.[a-zA-Z0-9-.]+'
    return re.findall(pattern, m_from)[0]

def extract_display_name(m_from):
    """    
    Extracting display name from a Mail From.

    Parameters
    ----------
    m_from : string
        String containing an email address
    
    Returns
    -------
        : string
        display name
    """
    delimiter = ' <'

    if delimiter in m_from:
        idx = m_from.find(delimiter)
        logger.info("There is Display Name")
        return m_from[:idx]
    else:
        logger.info("There is no Display Name")
        return "no_display_name"

Lambda ( Slack 通知 )

通知用の Lambda は、特定のディレクトリ名 ( メールの From ) 配下にオブジェクトが作成されたことを EventBridge が検知しキックされる想定です。
つきましては、検知させる From 毎に EventBridge と Lambda の組を用意する可能性があったため、モジュール読み込みの際に複数のリソースの組を定義できるように工夫し、且つ、本リポジトリで管理していない Lambda も参照できる形にしています。

※ notifier_groups にリストとして EventBridge と Lambda の組を渡します。

・notifier.tf.example

module "notifier" {
  source = "./modules/notifier"

  project     = var.project
  environment = var.environment

  notifier_groups = [
    {
      // Unique identifier
      name = "xxxx"
      // Triggering buckets
      bucket_name = "xxxx"
      // Triggering first renovation folder
      prefix = "xxxx"
      // Lambda Arn
      lambda_arn = "xxxx"
      // Lambda Function name
      lambda_function_name = "xxxx"
    },
    {
      name                 = "xxxx"
      bucket_name          = "xxxx"
      prefix               = "xxxx"
      lambda_arn           = "xxxx"
      lambda_function_name = "xxxx"
    },
    {
      name                 = "xxxx"
      bucket_name          = "xxxx"
      prefix               = "xxxx"
      lambda_arn           = "xxxx"
      lambda_function_name = "xxxx"
    }
  ]
}

Slack 通知用の Lambda は EventBridge から渡されたオブジェクトを読み込み、適宜整形して Slack の WebhookURL にリクエストを発行する流れとなります。

From の種類ごとに、異なった処理を行う Lambda 関数を用意する想定なので、1 サンプルとして基本的な Lambda 関数をリポジトリに配置しています。

・modules/notifier/example/slack/lambda/source/slack.py

import boto3
import json
import logging
import os
import re

from base64 import b64decode
from urllib.request import Request, urlopen
from urllib.error import URLError, HTTPError
from urllib.parse import quote

logger = logging.getLogger()
logger.setLevel(logging.INFO)

def lambda_handler(event, context):

    logger.info("Event: " + str(event))

    bucket_name = str(event['detail']['bucket']['name'])
    logger.info("Bucket: " + str(bucket_name))
    object_key = event['detail']['object']['key']
    object_list = event['detail']['object']['key'].split("/")

    for i in object_list:
        logger.info("Object: " + str(i))

    m_from = object_list[0]
    subject = object_list[1]
    date = object_list[2]
    content = read_s3_object(bucket_name, object_key)

    res = notify2slack(m_from, subject, date, content, object_key)

    logger.info("Response: " + str(res))


def read_s3_object(bucket_name, object_key):
    """
    Read files From S3.

    Parameters
    ----------
    bucket_name : string
        Bucket Name
    object_key : string
        File Name ( Path )

    Returns
    -------
    body : dict
        API Return Values
    """

    s3 = boto3.client("s3")

    try:
        res = s3.get_object(
            Bucket=bucket_name,
            Key=object_key
            )
        logger.info("Success: %s", res)
        body = res['Body'].read().decode('utf-8')
    except Exception as e:
        logger.error("Error: %s", e)
    return body

def notify2slack(m_from, subject, date, content, object_key):
    """
    Notify messages to slack.

    Parameters
    ----------
    m_from : string
        Mail From
    subject : string
        Mail Subject
    date : string
        Mail Date
    content : string
        Mail Content
    object_key : string
        File Name ( Path )
        
    Returns
    -------
    res : dict
        API Return Values
    """

    slack_message = {
        "channel": os.environ['channelName'],
        "icon_emoji": ":rotating_light:",
        "attachments": [
            {
                "color": "#FF0000",
                "title": "Email has been received.",
                "text": "<!here> \n *Content* \n ```%s``` \n" % (content),
                "fields": [
                    {
                        "title": "Date",
                        "value": date,
                        "short": True
                    },
                    {
                        "title": "Subject",
                        "value": subject,
                        "short": True
                    },
                    {
                        "title": "From",
                        "value": m_from,
                        "short": True
                    },
                    {
                        "title": "object_key",
                        "value": object_key,
                        "short": True
                    }
                ]

            }
        ]
    }

    req = Request(decrypt_hookurl(os.environ['HookUrl']), json.dumps(slack_message).encode('utf-8'))

    try:
        res = urlopen(req)
        res.read()
        logger.info("Message posted to %s", slack_message['channel'])
    except HTTPError as e:
        logger.error("Request failed: %d %s", e.code, e.reason)
    except URLError as e:
        logger.error("Server connection failed: %s", e.reason)
    return res


def decrypt_hookurl(hookurl):
    """
    Notify messages to slack.

    Parameters
    ----------
    hookurl : string
        WebhookURL that may be encrypted
        
    Returns
    -------
    hookurl : string
        WebhookURL

    decrypted_hookurl : string
        Decrypted WebhookURL
    """

    if  "hooks.slack.com" in hookurl:
        logger.info("HookURL is not Encrypted")
        return hookurl
    else:
        logger.info("HookURL is Encrypted")
        decrypted_hookurl = boto3.client('kms').decrypt(
            CiphertextBlob=b64decode(hookurl),
            EncryptionContext={'LambdaFunctionName': os.environ['AWS_LAMBDA_FUNCTION_NAME']}
        )['Plaintext'].decode('utf-8')
        return decrypted_hookurl

最後に

このブログを始めて、もう少しで 5 年が経過しそうです。
※ IT 業界で働きだしたのが 3 月なので、今月で丁度 5 年になります。
あくまでも自分の備忘録として存在しているサイトですので、稚拙な内容に関しては何卒ご容赦頂けると幸いでございます…。

引き続きどうぞよろしくお願いいたします。(•ᵕᴗᵕ•)

【Python】Backlog API を叩いて課題一覧を Excel に出力してみる【openpyxl】

こんにちは。
とある事情で月次で発生した障害情報を Excel に纏めて提出する必要が出てきたので、スクリプトを組んでみようと思います。
発生した障害は Backlog の Webhook 機能を使って課題として登録されているので、Backlog API を叩いて月の障害課題を収集します。
Python には openpyxl という Excel 操作用のライブラリが用意されているようなので、甘んじて使ってみます。
※ Python よく分からない民なので、割とむちゃくちゃしてるかもです。

ディレクトリ構成

テンプレートとなる Excel ファイルを templates ディレクトリ配下に配置しておき、API を叩いて取得した課題一覧をマージして output に出力する構成にしてみます。

.
├── main.py
├── output
└── templates
    └── template.xlsx

スクリプト

念のため API Key、スペース ID、プロジェクト ID 等の秘匿情報周りは環境変数から読み込めるようにしておきます。
また、課題の検索期間、検索キーワードはコマンドライン引数から指定できるように調整します。

#!/usr/bin/python3
# coding: utf-8

import json
import os
import urllib.request
import urllib.parse
import datetime
import sys
import openpyxl
import argparse

parser = argparse.ArgumentParser(
    usage='Specify the collection period in -p and the search word in -w as arguments',
    description='Output a list of issues to Excel by hitting the BackLog API.'
    )
parser.add_argument('-p', '--period', required=True, help='Specify the time period for collecting issues (1: this month to today or 2: last month)')
parser.add_argument('-w', '--word', required=True, help='Specify search words')
args = parser.parse_args()

if __name__ == '__main__':
    if args.period == "1":
        CREATED_SINCE = datetime.datetime.now().strftime('%Y' + "-" + '%m') + '-01'
        CREATED_UNTIL = datetime.datetime.now().strftime('%Y' + "-" + '%m' + "-" + '%d')
    elif args.period == "2":
        CREATED_SINCE = (datetime.datetime.today() - datetime.timedelta(datetime.datetime.today().day)).strftime('%Y-%m') + '-01'
        CREATED_UNTIL = (datetime.datetime.today() - datetime.timedelta(datetime.datetime.today().day)).strftime('%Y-%m-%d')
    else:
        print('Invalid argument.')
        sys.exit(1)

BACKLOG_API_KEY = os.environ['BACKLOG_API_KEY']
SPACE_ID = os.environ['SPACE_ID']
PROJECT_ID = os.environ['PROJECT_ID']
KEYWORD = urllib.parse.quote(args.word)
#CREATED_SINCE = '2022-xx-01'
#CREATED_UNTIL = '2022-xx-31'

URL = f'https://{SPACE_ID}.backlog.jp/api/v2/issues?apiKey={BACKLOG_API_KEY}&projectId[]={PROJECT_ID}&createdSince={CREATED_SINCE}&createdUntil={CREATED_UNTIL}&count=100&keyword={KEYWORD}'

def utc_to_jst(timestamp_utc):
    """
    @string
    UTC → JST に変換する
    """
    datetime_utc = datetime.datetime.strptime(timestamp_utc, "%Y-%m-%dT%H:%M:%SZ")
    datetime_jst = datetime_utc + datetime.timedelta(hours=9)
    timestamp_jst = datetime.datetime.strftime(datetime_jst, "%Y-%m-%d %H:%M:%S")
    return timestamp_jst
    
def get_alarm_list(url):
    """
    @string
    BackLog の課題を取得しパースしてから配列に突っ込む
    """
    request = urllib.request.Request(url)
    with urllib.request.urlopen(request) as response:
        data = json.loads(response.read().decode("utf-8"))

        lists = []
        for i in range(len(data)):
            lists.append(utc_to_jst(data[i]['created']) + "," + data[i]['summary'])
    return lists

"""
# NOTE: BackLog API 叩く
"""
res = get_alarm_list(URL)

"""
# NOTE: テンプレート( Excel )読み込み
"""
wb = openpyxl.load_workbook("templates/template.xlsx")
cover_ws = wb.worksheets[0]
list_ws = wb.worksheets[1]

"""
# NOTE: 表紙に資料作成日を追記
"""
cover_ws.cell(column=10, row=13, value=datetime.datetime.now().strftime('%Y' + "-" + '%m' + "-" + '%d'))

"""
# NOTE: 全課題を Excel シートに突っ込む
"""
for i in range(len(res)):
    list_ws.cell(column=3, row=(i + 3), value=res[i].split(',')[0])
    list_ws.cell(column=4, row=(i + 3), value=res[i].split(',')[1])
    print(res[i])

"""
# NOTE: Excel 保存
"""
wb.save("output/MonthlyAlarm_" + datetime.datetime.now().strftime('%Y%m%d%H%M%S') + ".xlsx")

openpyxl 以外はビルトインのモジュールを使ってみました。
※ いつも通りエラーハンドリングは 無視 省力です。自分用の備忘録ですしおすし。

【Terraform】Inspector V2 の ECR 拡張スキャン結果を Slack に通知する

こんにちは。
ECR の拡張スキャン結果を Slack に通知するリソースを Terraform で書いてみました。
※ 通知内容は Lambda でパースするので、極論 EventBridge の Input Transformer は不要です。

/**
# NOTE: Enhanced-Scanning EventBridge
*/

// 拡張スキャン Finding 実行結果のイベントルール
resource "aws_cloudwatch_event_rule" "ecr_enhanced_scanning_finding_event_rule" {
  name        = "${var.project}-${var.environment}-ecr-enhanced-scanning-finding-event-rule"
  description = "${var.project}-${var.environment}-ecr-enhanced-scanning-finding-event-rule"

  event_pattern = <<EOF
{
  "source": ["aws.inspector2"],
  "detail-type": ["Inspector2 Finding"],
  "detail": {
    "status": ["ACTIVE"],
    "severity": ["MEDIUM", "HIGH", "CRITICAL"]
  }
}
EOF
}

// 拡張スキャン Finding 実行結果の SNS 通知ルール
resource "aws_cloudwatch_event_target" "ecr_enhanced_scanning_finding_event_target" {
  rule      = aws_cloudwatch_event_rule.ecr_enhanced_scanning_finding_event_rule.name
  target_id = "${var.project}-${var.environment}-ecr-enhanced-scanning-finding-notification"
  arn       = aws_sns_topic.ecr_enhanced_scanning_finding.arn

  // JSON を整形して出力
  input_transformer {
    input_paths = {
      resources = "$.resources",
      firstobservedat = "$.detail.firstObservedAt",
      lastobservedat = "$.detail.lastObservedAt",
      updatedat = "$.detail.updatedAt",
      title = "$.detail.title",
      status = "$.detail.status",
      severity = "$.detail.severity",
      inspectorscore   = "$.detail.inspectorScore",
      sourceurl   = "$.detail.packageVulnerabilityDetails.sourceUrl",
    }
    input_template = <<EOF
{
  "resources": <resources>,
  "firstObservedAt": <firstobservedat>,
  "lastObservedAt": <lastobservedat>,
  "updatedAt": <updatedat>,
  "title": <title>,
  "status": <status>,
  "severity": <severity>,
  "inspectorScore": <inspectorscore>,
  "sourceUrl": <sourceurl>
}
EOF
  }
}

/**
# NOTE: Enhanced-Scanning SNS
*/

// 拡張スキャン Finding 実行結果の SNS 通知トピック
resource "aws_sns_topic" "ecr_enhanced_scanning_finding" {
  name = "ecr-enhanced-scanning-finding-notification"
}

// 拡張スキャン Finding 実行結果の SNS 通知トピック ポリシー
resource "aws_sns_topic_policy" "ecr_enhanced_scanning_finding" {
  arn    = aws_sns_topic.ecr_enhanced_scanning_finding.arn
  policy = data.aws_iam_policy_document.eventbridge_to_sns_finding.json
}

// SNS Finding Publish ポリシー
data "aws_iam_policy_document" "eventbridge_to_sns_finding" {
  statement {
    effect  = "Allow"
    actions = ["SNS:Publish"]

    principals {
      type        = "Service"
      identifiers = ["events.amazonaws.com"]
    }

    resources = [aws_sns_topic.ecr_enhanced_scanning_finding.arn]
  }
}

/**
# NOTE: IAM Role For Enhanced-Scanning Lambda
*/

// Lambda role
resource "aws_iam_role" "enhanced_scanning_lambda_role" {
  name               = "${var.project}-${var.environment}-ecr-enhanced-scanning-role"
  assume_role_policy = <<EOF
{
  "Version": "2012-10-17",
  "Statement": [
    {
      "Effect": "Allow",
      "Principal": {
        "Service": "lambda.amazonaws.com"
      },
      "Action": "sts:AssumeRole"
    }
  ]
}
EOF
}

// Lambda 基本実行 ポリシー アタッチ
resource "aws_iam_role_policy_attachment" "lambda_execution" {
  role       = aws_iam_role.enhanced_scanning_lambda_role.name
  policy_arn = "arn:aws:iam::aws:policy/service-role/AWSLambdaBasicExecutionRole"
}

// CloudWatch ReadOnly ポリシー アタッチ
resource "aws_iam_role_policy_attachment" "lambda_to_cw" {
  role       = aws_iam_role.enhanced_scanning_lambda_role.name
  policy_arn = "arn:aws:iam::aws:policy/CloudWatchReadOnlyAccess"
}

// SSM パラメータ 読み込み ポリシー
resource "aws_iam_policy" "lambda_to_ssm" {
  name = "${var.project}-${var.environment}-ecr-enhanced-scanning-policy"
  path = "/"

  policy = <<EOF
{
  "Version": "2012-10-17",
  "Statement": [
    {
      "Effect": "Allow",
      "Action": [
        "ssm:GetParameters",
        "secretsmanager:GetSecretValue",
        "kms:Decrypt"
      ],
      "Resource": "*"
    }
  ]
}
EOF
}

// SSM パラメータ 読み込み ポリシー アタッチ
resource "aws_iam_role_policy_attachment" "lambda_to_ssm" {
  role       = aws_iam_role.enhanced_scanning_lambda_role.name
  policy_arn = aws_iam_policy.lambda_to_ssm.arn
}

// 環境変数暗号化 KMS
resource "aws_kms_key" "enhanced_scanning_lambda" {
  description             = "${var.project}-${var.environment}-ecr-enhanced-scanning-lambda-kms"
  deletion_window_in_days = 7
  enable_key_rotation     = true
  is_enabled              = true
}

// 環境変数暗号化 KMS Alias
resource "aws_kms_alias" "enhanced_scanning_lambda" {
  name          = "alias/${var.project}/${var.environment}/ecr_enhanced_scanning_lambda_kms_key"
  target_key_id = aws_kms_key.enhanced_scanning_lambda.id
}

Lambda

EventBridge から SNS に通知されたことをトリガーに、データをパースして Slack の API を叩く Lambda を用意します。
※ EventBridge から直接 Lambda を叩くことも可能です。
今回は AWS にてデフォルトで用意されている cloudwatch-alarm-to-slack-python を調整して使用します。

Lambda > 関数 > 関数の作成 > 設計図の使用 > cloudwatch-alarm-to-slack-python

・既存のロールを使用する で Terraform で作成したロールを選択

・SNS トピック で Terraform で作成した SNS トピックを選択

・環境変数 の kmsEncryptedHookUrl に Slack のペイロード URL を定義
※ https:// のスキーマは除く

・転送時の暗号化 を選択し、Terraform で作成した KMS キーで暗号化

※ 06/17 追記: Lambda も Terraform でデプロイする記事を投稿しました。

【Terraform】 ECR 拡張スキャン通知用の Lambda を自動デプロイしてみる

<CHANNEL_NAME> を通知する Slack ルームの名称に置換して下記コードに置き換えます。

import boto3
import json
import logging
import os

from base64 import b64decode
from urllib.request import Request, urlopen
from urllib.error import URLError, HTTPError
from urllib.parse import quote

ENCRYPTED_HOOK_URL = os.environ['kmsEncryptedHookUrl']

HOOK_URL = "https://" + boto3.client('kms').decrypt(
    CiphertextBlob=b64decode(ENCRYPTED_HOOK_URL),
    EncryptionContext={'LambdaFunctionName': os.environ['AWS_LAMBDA_FUNCTION_NAME']}
)['Plaintext'].decode('utf-8')

logger = logging.getLogger()
logger.setLevel(logging.INFO)


def lambda_handler(event, context):
    logger.info("Event: " + str(event))
    message = json.loads(event['Records'][0]['Sns']['Message'])
    logger.info("Message: " + str(message))

    resources = message['resources'][0]
    title = message['title']
    severity = message['severity']
    inspector_score = message['inspectorScore']
    source_url = message['sourceUrl']

    slack_message = {
        'channel': "#<CHANNEL_NAME>",
        'text': "<!here> \n ■ <https://ap-northeast-1.console.aws.amazon.com/ecr/repositories?region=ap-northeast-1 | *ECR*> : _スキャン結果に脆弱性が存在します。_ \n *Resources* : %s \n *Title* : %s \n *Severity* : %s \n *Inspector_score* : %s \n *Source_url* : %s \n" % (resources, title, severity, inspector_score, source_url)
    }


    logger.info("HOOK_URL: " + str(HOOK_URL))
    req = Request(HOOK_URL, json.dumps(slack_message).encode('utf-8'))
    try:
        response = urlopen(req)
        response.read()
        logger.info("Message posted to %s", slack_message['channel'])
    except HTTPError as e:
        logger.error("Request failed: %d %s", e.code, e.reason)
    except URLError as e:
        logger.error("Server connection failed: %s", e.reason)

動作検証

実際にコンテナイメージを ECR に push して動作を確認します。

aws ecr get-login-password --region ap-northeast-1 | docker login --username AWS --password-stdin xxxxxxxxxx.dkr.ecr.ap-northeast-1.amazonaws.com

DOCKER_BUILDKIT=1 docker build . -f Dockerfile -t src_app
docker tag src_app xxxxxxxxxx.dkr.ecr.ap-northeast-1.amazonaws.com/sanuki-inspection-repository
docker push xxxxxxxxxx.dkr.ecr.ap-northeast-1.amazonaws.com/sanuki-inspection-repository

下記のように Slack にメッセージが通知されれば成功です。
ECR の管理画面から詳細な情報を確認することも可能です。

SAM + dynamodb-local でローカルにサーバレス開発環境を作って遊んでみる

こんにちは。
最近、DynamoDB について触る機会があったので、少し勉強してみようかな、と。
調べてみると ローカルに DynamoDB を立てることができる dynamodb-local というものがあるそうです。
SAM と dynamodb-local を使ってローカルにサーバレス開発環境を作り、簡単な掲示板を作成してみようと思います。

構成

JavaScript:クライアント
SAM ( ApiGateWay / Lambda ) : バックエンド API
dynamodb-local:データストア
サーバ IP:192.168.33.55

よくあるタイプのやつですね。
SAM ( ApiGateWay / Lambda ) でデータ取得 / データ登録 の REST API を作って、 JavaScript で操作、データは dynamodb-local に保存します。

環境構築

dynamodb-local は Docker のイメージが公開されています。
CentOS7 に SAM と dynamodb-local をセットアップする Ansible の role を こちら に用意しました。

環境構築後は、事前に dynamodb-local にテーブルを作成しておきます。

# テーブル作成
aws dynamodb create-table --table-name 'bbs' \
--attribute-definitions '[{"AttributeName":"postId","AttributeType": "S"}]' \
--key-schema '[{"AttributeName":"postId","KeyType": "HASH"}]' \
--provisioned-throughput '{"ReadCapacityUnits": 5,"WriteCapacityUnits": 5}' \
--endpoint-url http://localhost:8000

バックエンド API

データ取得 / データ登録 の API を Python で作成します。
ディレクトリ構成は下記の通りです。

.
├── bbs
│ ├── create
│ │ └── app.py
│ └── read
│   └── app.py
├── template.yaml
└── vars.json

・データ取得 API ( ./bbs/read/app.py )

import json
import boto3
import time
import logging
import os
from botocore.exceptions import ClientError

logger = logging.getLogger()
logger.setLevel(logging.INFO)

def lambda_handler(event, context):

    logger.info("Event: " + str(event))

    responseHeaders = {
      "Access-Control-Allow-Methods": "OPTIONS,GET",
      "Access-Control-Allow-Headers" : "*",
      "Access-Control-Allow-Origin": "*"
    }

    try:
        table = _get_database().Table('bbs')
        res = table.scan()
    except ClientError as e:
        logger.error("Error: %s", e)

    return {
        "headers": responseHeaders,
        "statusCode": 200,
        "body":  json.dumps(res['Items'], default=decimal_default_proc),
    }

def decimal_default_proc(obj):
    from decimal import Decimal
    if isinstance(obj, Decimal):
        return float(obj)
    raise TypeError

def _get_database():
    if (os.environ["DYNAMO_ENDPOINT"] == ""):
        endpoint = boto3.resource('dynamodb')
    else:
        endpoint = boto3.resource('dynamodb', endpoint_url=os.environ["DYNAMO_ENDPOINT"])
    return endpoint

・データ登録 API ( ./bbs/create/app.py )

import json
import boto3
import time
import datetime
import logging
import uuid
import os
from boto3.dynamodb.conditions import Key, Attr
from botocore.exceptions import ClientError

logger = logging.getLogger()
logger.setLevel(logging.INFO)

def lambda_handler(event, context):

    logger.info("Event: " + str(event))

    responseHeaders = {
      "Access-Control-Allow-Methods": "OPTIONS,GET,POST",
      "Access-Control-Allow-Headers" : "*",
      "Access-Control-Allow-Origin": "*"
    }

    req = json.loads(event['body'])

    item = {
        'postId': str(uuid.uuid4()),
        'time': str(datetime.datetime.now()),
        'owner': req['owner'],
        'note': req['note'],
        'enable': bool('True')
    }

    logger.info("Item: " + str(item))

    try:
        table = _get_database().Table('bbs')
        res = table.put_item(Item=item)
        logger.info("Respons: " + str(res))
    except ClientError as e:
        logger.error("Error: %s", e)

    return {
        "headers": responseHeaders,
        "statusCode": 200,
        "body": item,
    }

def _get_database():
    if (os.environ["DYNAMO_ENDPOINT"] == ""):
        endpoint = boto3.resource('dynamodb')
    else:
        endpoint = boto3.resource('dynamodb', endpoint_url=os.environ["DYNAMO_ENDPOINT"])
    return endpoint

・環境変数定義ファイル : DynamoDB への接続先エンドポイント ( ./vars.json )

{
    "Parameters": {
      "DYNAMO_ENDPOINT": "http://192.168.33.55:8000"
    }
}

・SAM の template ファイル : API の仕様やその他諸々 ( ./template.yaml )

AWSTemplateFormatVersion: '2010-09-09'
Transform: AWS::Serverless-2016-10-31
Description: BBS

Globals:
  Function:
    Timeout: 3
    Environment:
      Variables:
        DYNAMO_ENDPOINT: DYNAMO_ENDPOINT
  Api:
    Cors:
      AllowMethods: "'OPTIONS,GET,POST'"
      AllowHeaders: "'*'"
      AllowOrigin: "'*'"

Resources:
  ReadBBSFunction:
    Type: AWS::Serverless::Function
    Properties:
      CodeUri: bbs/read/
      Handler: app.lambda_handler
      Runtime: python3.9
      Events:
        ReadBBS:
          Type: Api
          Properties:
            Path: /bbs/
            Method: get

  CreateBBSFunction:
    Type: AWS::Serverless::Function
    Properties:
      CodeUri: bbs/create/
      Handler: app.lambda_handler
      Runtime: python3.9
      Events:
        CreateBBS:
          Type: Api
          Properties:
            Path: /bbs/
            Method: post

API の起動

コードをビルドして API を起動します。
※ デフォルトは 3000 ポートで立ち上がります。

sam build
sam local start-api --env-vars vars.json --host 0.0.0.0

curl で API を叩いてエラー無くレスポンスが返ってくれば OK です。
※ 初回リクエスト時にイメージがビルドされるようで、その際レスポンスが少々遅延するようです。
$ curl http://192.168.33.55:3000/bbs
[]

クライアント

Ajax でデータ取得 API を叩いて投稿情報を取得し、一覧を表示します。
併せてデータ登録 API に投稿を POST して登録を行います。

<!DOCTYPE html>
<html>
    <head>
        <meta charset="utf-8">
        <title>bbs</title>
    </head>
    <body>
        <dl id="wrap">
            <script src="https://ajax.googleapis.com/ajax/libs/jquery/2.2.4/jquery.min.js"></script>
            <script type="text/javascript">
            const url = "http://192.168.33.55:3000/bbs";
              $(function(){
                $.getJSON(url, function(note_list){
                  note_list.sort(function(a, b){
                    if (a.time < b.time){
                      return -1;
                    }else{
                      return 1;
                    }
                  });
                  for(var i in note_list){
                    var h = '<dt>'
                          + note_list[i].time
                          + " "
                          + note_list[i].owner
                          + '</dt>'
                          + '<dd>'
                          + note_list[i].note
                          + '</dd>';
                    $("dl#wrap").append(h);
                  }
                });
              });
            </script>
          </dl>
          <p>投稿者: <input type="text" id="owner" size="30"></p>
          <p>NOTE: <input type="text" id="note" size="30"></p>
          <p><button id="button" type="button">投稿</button></p>
          <script type="text/javascript">
            $(function(){
                $("#response").html("Response Values");
        
                $("#button").click( function(){
                    var url = "http://192.168.33.55:3000/bbs";
                        var JSONdata = {
                            "owner": String($("#owner").val()) ,
                            "note": String($("#note").val())     
                        };
        
                    $.ajax({
                        type : 'post',
                        url : url,
                        data : JSON.stringify(JSONdata),
                        contentType: 'application/json',
                        dataType : 'json',
                        scriptCharset: 'utf-8',
                        success : function(time){
                          window.location.reload();
                        },
                        error : function(time){
                          window.location.reload();
                        }
                    });
                })
            })
        </script>
    </body>
</html>

Jenkins + Selenium + Chrome で テストを実行する CI/CD 環境 を作ってみる。

こんにちは。
最近、WSL に Selenium をインストールして遊んでいました。
そこで、ふと思ったのですが、これを CI/CD パイプラインに組み込んだら面白いのではないかと考えました。
Jenkinsの勉強も兼ねて、環境を構築してみることにします。
具体的には、以下のようなパイプラインを作成します。

1. サーバにコンテンツをデプロイする。
2. デプロイ後に Selenium でテストを行う。
3. テスト結果を Slack に通知する。

この一連の流れを自動化し、効率的に運用できる環境を目指します。

Jenkins 構築

CentOS7 に Jenkins / Selenium / Chrome のパッケージを導入します。

yum install wget unzip git
rpm --import https://pkg.jenkins.io/redhat-stable/jenkins.io.key
yum install epel-release
yum install java-11-openjdk-devel
wget -O /etc/yum.repos.d/jenkins.repo https://pkg.jenkins.io/redhat-stable/jenkins.repo
yum install jenkins
systemctl start jenkins.service
systemctl enable jenkins.service

cat << "EOF" >> /etc/yum.repos.d/google.chrome.repo
[google-chrome]
name=google-chrome
baseurl=http://dl.google.com/linux/chrome/rpm/stable/$basearch
enabled=1
gpgcheck=1
gpgkey=https://dl-ssl.google.com/linux/linux_signing_key.pub
EOF

yum install xorg-x11-server-Xvfb
yum install google-chrome-stable
yum install ipa-gothic-fonts ipa-mincho-fonts ipa-pgothic-fonts ipa-pmincho-fonts

yum install python3
pip3 install selenium

cd /usr/local/src/
wget https://chromedriver.storage.googleapis.com/93.0.4577.15/chromedriver_linux64.zip
unzip chromedriver_linux64.zip
mv chromedriver /usr/local/bin/

Jenkins の UI から Xvfb / Slack Notification のプラグインを導入します。
※ Slack 側で Jenkins CI を予め追加しておいてください。
Jenkinsの管理 > プラグインの管理 > 利用可能 > Xvfb > Download now and install after

Jenkinsの管理 > Global Tool Configuration > Xvfb installation追加 > Name に Xvfb を入力 > Save

Jenkinsの管理 > プラグインの管理 > 利用可能 > Slack Notification > Download now and install after

Jenkinsの管理 > システムの設定 > Slack > Workspace に チームサブドメインを入力

Jenkinsの管理 > システムの設定 > Slack > Credential 追加 > Jenkins > 種類 Secret text 

Secret : インテグレーション用トークン認証情報 ID
ID : 任意

> 保存

デプロイジョブの作成

デプロイはシンプルに、ターゲットサーバに SSH 接続して develop ブランチを git pull するだけとします。
Jenkins は jenkins ユーザとして実行されるため、ホームディレクトリ配下にターゲットサーバに設定した公開鍵と対になる秘密鍵を配置しておきます。

mkdir /var/lib/jenkins/.ssh
vi /var/lib/jenkins/.ssh/id_rsa
chown -R jenkins:jenkins /var/lib/jenkins/.ssh
chmod 700 /var/lib/jenkins/.ssh
chmod 600 /var/lib/jenkins/.ssh/id_rsa

新規ジョブ作成 > フリースタイル・プロジェクトのビルド

から

ビルド手順の追加 > シェルの実行
で下記のワンライナーを実行するだけです。

ssh -oStrictHostKeyChecking=no target@xxx.xxx.xxx.xxx "cd /path/to/hoge; git pull origin develop"

ビルド後の処理の追加 > 他のプロジェクトのビルド
で 後述の テストジョブを指定します。

テストジョブの作成

Jenkins サーバの適当なディレクトリに Selenium のスクリプトを配置しておきます。
※ 今回は個人的に作った以下 WEB ツール上で、適当に画面を偏移するスクリプトを用意しました。
https://github.com/snkk1210/ease

#!/usr/bin/python3

import time
import datetime
from selenium import webdriver

URL='http://xxx.xxx.xxx.xxx'
USER="xxx@localhost"
PASSWD="xxx"

def clickHref(link):
    driver.find_element_by_link_text(link).click()
    time.sleep(1)
    return 0

def clickBtn(xpath):
    driver.find_element_by_xpath(xpath).click()
    time.sleep(1)
    return 0

def inputForm(element, input):
    driver.find_element_by_name(element).send_keys(input)
    time.sleep(1)
    return 0

def dialogboxThrough():
    driver.switch_to_alert().accept()
    time.sleep(1)
    return 0

driver = webdriver.Chrome(executable_path='/usr/local/bin/chromedriver')

driver.get(URL)

# login check

inputForm("email", USER)

inputForm("password", PASSWD)

clickBtn("//button[@class='btn btn-block btn-flat btn-primary']")

# sidemenu check

side_menus = ['Playbooks','Make Playbook','Authentications','Make Auth','Archives','Upload Files','Profile','Members']
for side_menu in side_menus:
    clickHref(side_menu)

# make playbook check

clickHref("Make Playbook")

inputForm("name", "test-playbook" + str(time.time()))

inputForm("private_key", "aaa")

inputForm("inventory", "bbb")

clickBtn("//input[@class='btn btn-success']")

# edit playbook check

clickHref("Playbooks")

clickBtn("//input[@class='btn btn-success']")

inputForm("private_key", "aaa")

inputForm("inventory", "bbb")

clickBtn("//input[@class='btn btn-success']")

# archive playbook check

clickHref("Playbooks")

clickBtn("//input[@class='btn btn-warning']")

# delete playbook check

clickHref("Archives")

clickBtn("//input[@class='btn btn-danger']")

dialogboxThrough()

# exit

time.sleep(5)
driver.quit()

新規ジョブ作成 > フリースタイル・プロジェクトのビルド

から

ビルド環境 > Start Xvfb before the build, and shut it down after.
に チェックを入れます。

ビルド手順の追加 > シェルの実行
で上記のスクリプトを実行するように指定してあげるだけで OK です。

ビルド後の処理の追加 > Slack Notifications
を設定しておけば、ジョブの実行結果を Slack に通知することが可能です。

【サーバレス】Lambda + API Gateway + Flask で Web ツールを作ってみる【AWS】

こんにちは。
仕事でサーバレス環境を扱うことがありまして、勉強がてら少し触ってみようと思ったんですね。
先日に SSL/TLS 証明書の整合性チェックツールを Flask で作ったんで、こちらをサーバレス環境で動かしてみます。
https://github.com/keisukesanuki/certificate_verify_flask_lambda

zappa

コードのデプロイ用に zappa というツールがあるそうです。。
下記手順で簡単に Lambda + API Gateway の環境構築とアプリケーションのデプロイが完了するようです。

# 必要なパッケージの導入
yum groupinstall "Development tools" -y
yum install zlib-devel openssl-devel sqlite-devel -y

# pyenvの導入
git clone https://github.com/pyenv/pyenv.git ~/.pyenv
echo 'export PATH="$HOME/.pyenv/bin:$PATH"' >> ~/.bash_profile
echo 'eval "$(pyenv init -)"' >> ~/.bash_profile
source ~/.bash_profile

# pyenv-virtualenvの導入
git clone https://github.com/yyuu/pyenv-virtualenv.git ~/.pyenv/plugins/pyenv-virtualenv
echo 'eval "$(pyenv virtualenv-init -)"' >> ~/.bash_profile
exec $SHELL -l

# 3.6系のpythonを導入
pyenv install 3.6.5
pyenv global 3.6.5

# awscliの導入/設定
pip install -U pip
pip install awscli
aws configure

# ソースの取得
pyenv virtualenv 3.6.5 lambda
git clone https://github.com/keisukesanuki/certificate_verify_flask_lambda.git 
cd certificate_verify_flask_lambda
pyenv local lambda

# モジュールの導入
pip install -U pip
pip install flask
pip install zappa

# lambdaにデプロイ
zappa init
===========================================================================
What do you want to call this environment (default 'dev'): certificateCheck
===========================================================================
zappa deploy

【Python】JMeter の実行結果をスプレッドシートに出力するスクリプトを書いてみた【gspread】

こんにちは。
JMeter が出力する結果を Google のスプレッドシートに出力してみようと考えまして、調べてみると Python に便利なライブラリがあったんで作ってみました。
※ 下記の JMeter デプロイ用 Playbook にも入れているのでよければご利用くださいませ。
https://github.com/keisukesanuki/jmeter-MS

Python スクリプト

#!/usr/bin/python3

import gspread
import json
import csv
import sys
import itertools

# シークレットキーを絶対パスで指定
SECRETJSON = "/usr/local/jmeter/bin/sacred-drive.json"
# スプレッドシートキーを定義
SPREADSHEET_KEY = 'xxxxxxxxxxxxxxxxxxxxxxxxxxxxxxxxxxxxxxxxxxxxxxxxxxxxxxxx'

############################################################################
## 関数

# 数字と文字コンバーター
def num2alpha(num):
    if num<=26:
        return chr(64+num)
    elif num%26==0:
        return num2alpha(num//26-1)+chr(90)
    else:
        return num2alpha(num//26)+chr(64+num%26)

#############################################################################
## 認証

# お約束
from oauth2client.service_account import ServiceAccountCredentials
scope = ['https://spreadsheets.google.com/feeds','https://www.googleapis.com/auth/drive']

# ダウンロードした json ファイルを定義
credentials = ServiceAccountCredentials.from_json_keyfile_name(SECRETJSON, scope)

# Google API にログイン
gc = gspread.authorize(credentials)

# スプレッドシートのシート1を開く
worksheet = gc.open_by_key(SPREADSHEET_KEY).sheet1


##############################################################################
## 処理

# コマンドライン引数を取得
args = sys.argv
csvfile = args[1]

# CSVファイルの内容を配列に代入
with open(csvfile) as fp:
    results_list_ex = list(csv.reader(fp))

# 2次元配列を1次元配列に変換
results_list = list(itertools.chain.from_iterable(results_list_ex))

# カウント変数初期化
COUNT_NUM = 1
# 空白行探索
while str(len(worksheet.cell(COUNT_NUM, 1).value)) != "0":
        COUNT_NUM += 1

# 編集する範囲を指定
cell_list = worksheet.range('A'+str(COUNT_NUM)+':'+num2alpha(len(results_list))+str(COUNT_NUM))

# cell_listにresults_listの配列を代入
for i,cell in enumerate(cell_list):
    cell.value = results_list[i]

# 結果の保存
worksheet.update_cells(cell_list)

第一引数に csv ファイルを指定することで、結果をスプレッドシートに出力するスクリプトです。
このスクリプトを後述の JMeter 起動用スクリプトで利用します。

シェルスクリプト

#!/bin/sh

DATE=$(date +"%Y%m%d")
OPTIME=$(date +"%Y%m%d-%H%M%S")
# 結果の出力先ディレクトリを指定
LOGDIR=/var/www/html/${DATE}
# JMXファイルを指定
FILE_JMX=/usr/local/jmeter/bin/templates/build-web-test-plan.jmx

# 日付ディレクトリの作成
mkdir -p ${LOGDIR}

# JMeter 起動
/usr/local/jmeter/bin/jmeter -Dsun.net.inetaddr.ttl=0 -n -t ${FILE_JMX} -j ${LOGDIR}/${OPTIME}.log -l ${LOGDIR}/${OPTIME}.jtl -e -o ${LOGDIR}/${OPTIME}_th${JMETER_THREAD}${2}/ -r

# CSV ファイルの作成
cat ${LOGDIR}/${OPTIME}_th${JMETER_THREAD}${2}/statistics.json | jq  -r ". [] | [.transaction,.sampleCount,.errorCount,.errorPct,.meanResTime,.minResTime,.maxResTime,.pct1ResTime,.pct2ResTime,.pct3ResTime,.throughput,.receivedKBytesPerSec,.sentKBytesPerSec] | @csv" | grep "Total" > ${LOGDIR}/${OPTIME}_th${JMETER_THREAD}${2}/statistics.csv

# スプレッドシートに結果を出力
/usr/local/bin/main.py ${LOGDIR}/${OPTIME}_th/statistics.csv

JMeter は json で結果を出力するので jq で無理やり csv に変換してます。

Python だと簡単に実装できて楽ですね。

補足

スクリプトの実行に下記のパッケージ導入が必要です。

yum install python3 python-devel jq
pip3 install gspread
pip3 install oauth2client

【Python】Excel から Ansible のコードを自動生成する①【構築自動化】

Excel から必要な情報を抜き出して、Ansible の ini ファイルを置換する Python スクリプトを書いてみました。

#!/usr/bin/python3
# coding: UTF-8

import openpyxl
import sys

# Ansible の ini ファイルを定義(置換前)
org_file_name = "all.yml.org"
# Ansible の ini ファイルを定義(置換後)
file_name = "all.yml"

# コマンドライン引数の数を確認
if len(sys.argv) != 2:
    print("input error")
    sys.exit(1)

# Excel ファイル名を変数に代入
args = sys.argv
target = args[1]

# Excel データを取得
wb = openpyxl.load_workbook(target)
sheet = wb.get_sheet_by_name('Sheet1')

# セルデータの取得関数
def get_cell(x, y):
    param = sheet.cell(row=x,column=y).value
    return param

# 必要なセルの情報を取得
domain = get_cell(2, 2)
docroot = get_cell(3, 2)

# 置換前の ini ファイルを開く
with open(org_file_name, encoding="cp932") as f:
    data_lines = f.read()

# 置換
data_lines = data_lines.replace("xxx", domain)
data_lines = data_lines.replace("yyy", docroot)

# 置換後のiniファイルを作成
with open(file_name, 'w', encoding="cp932") as f:
    f.write(data_lines)

スクリプトのコマンドライン引数としてExcelファイル(.xlsx)を指定して実行してください。

【Lambda】アラート通知を判別して別々の絵文字を付与し Slack に通知してみる【slack】

【Lambda】CloudWatch の通知を Lambda で Slack に飛ばしてみる【Slack】


↑ 前回の記事の続きです。

アラーム、リカバリ時の通知が判別し辛いので、それぞれの通知に対して別々の絵文字を付与してみます。
※ ランタイムは python3.7 です。

import boto3
import json
import logging
import os

from base64 import b64decode
from urllib.request import Request, urlopen
from urllib.error import URLError, HTTPError


# 通知するチャンネル定義
SLACK_CHANNEL = "#xxxxxx"

# WEB_HOOKURL 定義
HOOK_URL = "https://hooks.slack.com/services/xxxxxxxxxxxxxxxxxxxxxxxxxxxxxxxxxxxxx"

logger = logging.getLogger()
logger.setLevel(logging.INFO)


def lambda_handler(event, context):
    logger.info("Event: " + str(event))
    message = json.loads(event['Records'][0]['Sns']['Message'])
    logger.info("Message: " + str(message))

    alarm_name = message['AlarmName']
    new_state = message['NewStateValue']
    reason = message['NewStateReason']

    stamp = ":warning:"
    if new_state == "ALARM":
        stamp = ":warning:"
    else:
        stamp = ":ok_woman:"
        
    slack_message = {
        'channel': SLACK_CHANNEL,
        'text': "%s %s state is now %s: %s" % (stamp, alarm_name, new_state, reason)
    }

    req = Request(HOOK_URL, json.dumps(slack_message).encode('utf-8'))
    try:
        response = urlopen(req)
        response.read()
        logger.info("Message posted to %s", slack_message['channel'])
    except HTTPError as e:
        logger.error("Request failed: %d %s", e.code, e.reason)
    except URLError as e:
        logger.error("Server connection failed: %s", e.reason)

CloudWatch からの通知が ALARM であれば :warning: を付与、それ以外であれば :ok_woman: を付与します。

【Lambda】CloudWatch の通知を Lambda で Slack に飛ばしてみる【Slack】

担当している案件で CloudWatch からの通知を Slackに飛ばす必要があったので、Lambda で実装してみます。

1.事前準備

■ 通知を飛ばす Slack に Incoming WebHooks を追加しておく
https://slack.com/services/new/incoming-webhook

■ 必要なポリシーを付与した IAM ロールを作成しておく
・CloudWatchReadOnlyAccess
・AWSLambdaBasicExecutionRole

■ CloudWatch + SNS の通知設定

2.Lambda設定

Lambda > 関数 > 関数の作成 > 一から作成

関数名:<>
ランタイム:python 3.7
実行ロールの選択: 事前準備で作成したIAMロール

> トリガーを追加

トリガーの設定:SNS
SNS トピック:「事前準備で作成したSNSトピック」
トリガーの有効化:有効

関数コード

import boto3
import json
import logging
import os

from base64 import b64decode
from urllib.request import Request, urlopen
from urllib.error import URLError, HTTPError


# 通知を飛ばすチャンネルを定義
SLACK_CHANNEL = "#xxxxxx"

# WEB_HOOKURLを定義
HOOK_URL = "https://hooks.slack.com/services/xxxxxxxxxxxxxxxxxxxxxxxxxxxxxxxxxxxxx"

logger = logging.getLogger()
logger.setLevel(logging.INFO)


def lambda_handler(event, context):
    logger.info("Event: " + str(event))
    message = json.loads(event['Records'][0]['Sns']['Message'])
    logger.info("Message: " + str(message))

    alarm_name = message['AlarmName']
    #old_state = message['OldStateValue']
    new_state = message['NewStateValue']
    reason = message['NewStateReason']

    slack_message = {
        'channel': SLACK_CHANNEL,
        'text': "%s state is now %s: %s" % (alarm_name, new_state, reason)
    }

    req = Request(HOOK_URL, json.dumps(slack_message).encode('utf-8'))
    try:
        response = urlopen(req)
        response.read()
        logger.info("Message posted to %s", slack_message['channel'])
    except HTTPError as e:
        logger.error("Request failed: %d %s", e.code, e.reason)
    except URLError as e:
        logger.error("Server connection failed: %s", e.reason)

⇒「SLACK_CHANNEL」「HOOK_URL」に通知を飛ばすチャンネル名とWebHookURLを定義してください。