【AWS】SES で受信したメールを Lambda で加工して Slack に通知するパイプラインを Terraform で作る【Python】

こんにちは。
気づくと既に 2023 年も 1/4 が経過しており、時間の進む速度感覚がおかしくなってきた今日この頃でございます。

さて、とある事情から SES receipt rule で受信したメールを加工して Slack に通知させる必要がでてきました。
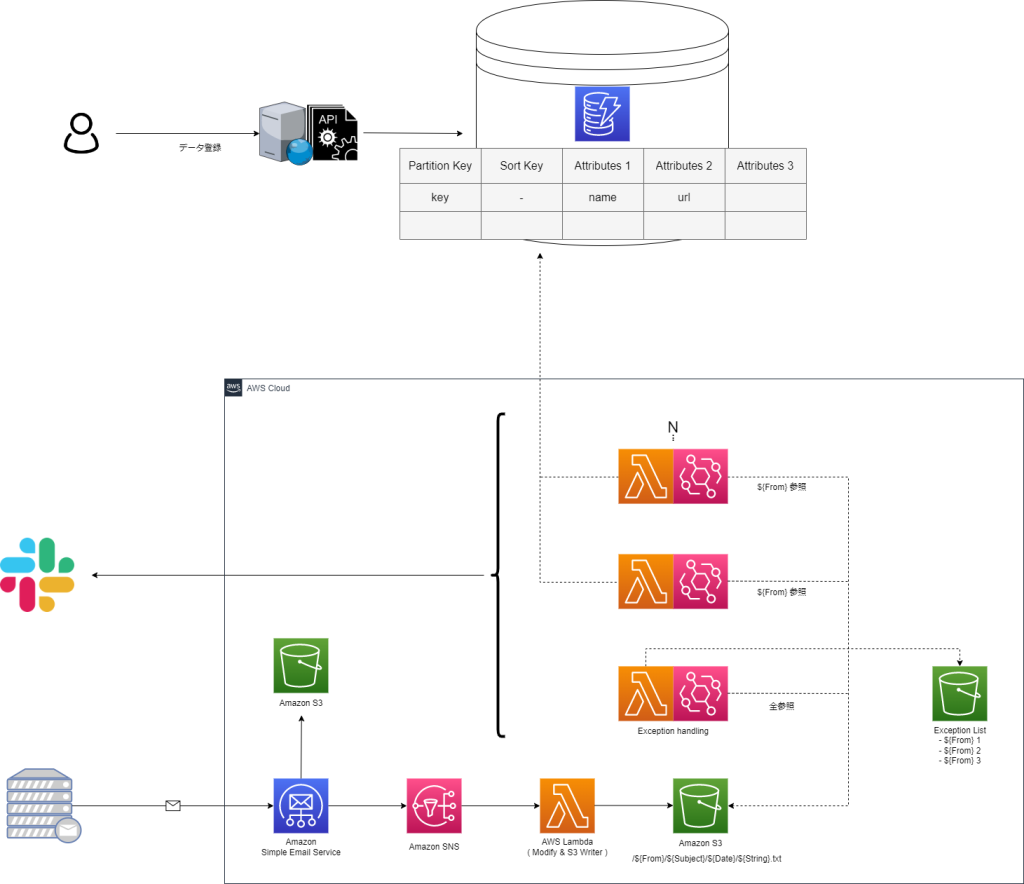
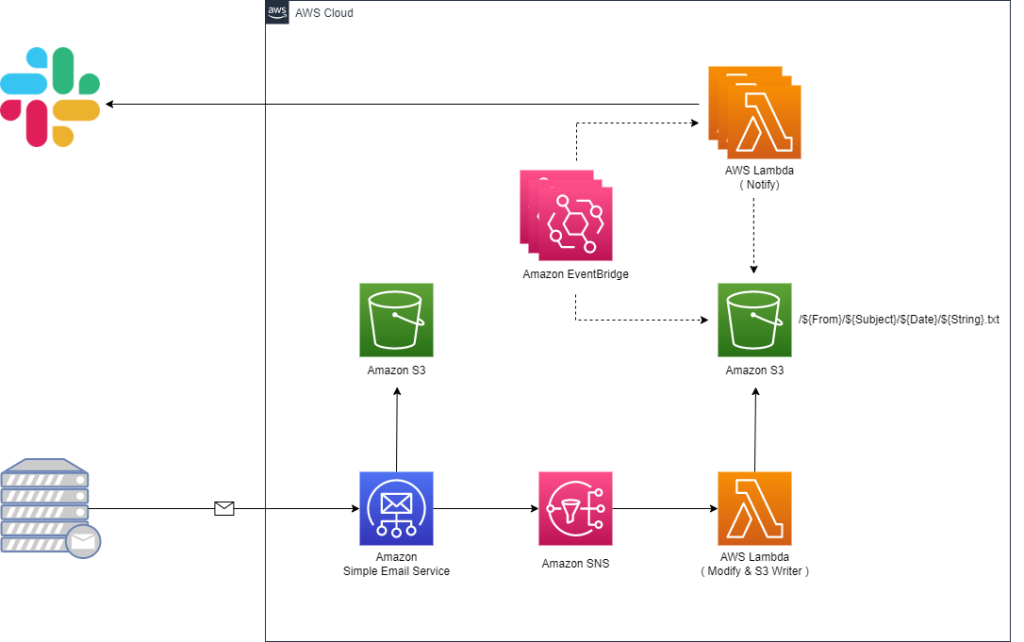
具体的には最終的に下記構成のようなパイプラインを構築しようと考えております。

・メール受信時にメール加工用 Lambda を起動し、データを S3 に格納
・特定の From のメールが S3 に格納されたことをトリガーに通知用 Lambda を起動
・別システムのデータベースから情報を引っ張ってきて Slack へ通知

つきましては、この構成の一部を Terraform で管理してみようと思います。

構成図

今回は SES receipt rule → SNS → Lambda → S3 → EventBridge → Lambda までを一括でデプロイできる HCL を作成します。

HCL

作成したコード一式は こちら になります。

.
├── README.md
├── example-slack-lambda.tf.example
├── modules
│   ├── notifier
│   │   ├── eventbridge.tf
│   │   ├── example
│   │   │   ├── basic
│   │   │   │   ├── lambda
│   │   │   │   │   ├── bin
│   │   │   │   │   └── source
│   │   │   │   │       └── basic.py
│   │   │   │   ├── lambda.tf
│   │   │   │   └── variables.tf
│   │   │   └── slack
│   │   │       ├── lambda
│   │   │       │   ├── bin
│   │   │       │   └── source
│   │   │       │       └── slack.py
│   │   │       ├── lambda.tf
│   │   │       └── variables.tf
│   │   └── variables.tf
│   └── receiver
│       ├── lambda
│       │   ├── bin
│       │   └── source
│       │       └── receiver.py
│       ├── lambda.tf
│       ├── s3-processed.tf
│       ├── s3-receiver.tf
│       ├── ses-receipt-rule.tf
│       ├── sns.tf
│       └── variables.tf
├── notifier.tf.example
└── receiver.tf.example

modules/ 配下に各種リソース定義を配置し、上位からモジュールを読み込む想定です。
※ .example はモジュール読み込み用のテンプレートです。

以降、要所をツラツラと記載させて頂きます。

Lambda ( メール加工 )

SES で受信したメールを加工する Lambda を用意します。
処理の詳細はメールの From、受信日、件名、本文、表示名を抜き出し、S3 に格納する、とします。
S3 に格納する情報は、後に繋ぎやすいように、本文のみのオブジェクトとし、その他の情報はオブジェクトを格納するディレクトリ名として保持させます。

・modules/receiver/lambda/source/receiver.py

import boto3
import json
import logging
import email
import random
import string
import os
import re

logger = logging.getLogger()
logger.setLevel(logging.INFO)

def lambda_handler(event, context):

    logger.info("Event: " + str(event))
    
    message = json.loads(event['Records'][0]['Sns']['Message'])
    m_from = message['mail']['commonHeaders']['from'][0]
    date = message['mail']['commonHeaders']['date']
    subject = message['mail']['commonHeaders']['subject']
    content = message['content']
    email_obj = email.message_from_string(content)

    body = perth_mail_body(email_obj)
    logger.info("Body: " + str(body))

    fname = extract_mail_address(m_from).replace("/","[slash]") + "/" \
        + subject.replace("/","[slash]") \
        + "/" + date.replace("/","[slash]") \
        + "/" + extract_display_name(m_from) + "[dn]" + randomstr(20) + ".txt"
    logger.info("Fname: " + str(fname))

    res = put2s3(body, fname)
    logger.info("Response: " + str(res))

def perth_mail_body(email_obj):
    """
    Retrieve the body part of the mail.

    Parameters
    ----------
    email_obj : object structure

    Returns
    -------
    body : string
        body part of the mail
    """

    body = ""
    for part in email_obj.walk():
        logger.info("maintype: " + part.get_content_maintype())
        if part.get_content_maintype() == 'multipart':
            continue

        attach_fname = part.get_filename()

    if not attach_fname:
        charset = str(part.get_content_charset())
        if charset:
            body += part.get_payload(decode=True).decode(charset, errors="replace")
        else:
            body += part.get_payload(decode=True)
    else:
        logger.info("There is Attach File")
        body += "Error: Attachments are not supported -> " + str(part.get_payload(decode=True))

    return body

def put2s3(body, fname):
    """
    Upload files to S3.

    Parameters
    ----------
    body : string
        File Contents
    fname : string
        File Name ( Path )

    Returns
    -------
    res : dict
        API Return Values
    """

    s3 = boto3.client("s3")

    try:
        res = s3.put_object(
            Bucket=os.environ['s3BucketName'],
            ACL='private',
            Body=body,
            Key=fname,
            ContentType='text/plain'
            )
        logger.info("Success: %s has been written.", fname)
        logger.info("Success: %s", res)
    except Exception as e:
        logger.error("Error: %s", e)
    return res

def randomstr(n):
    """
    Generate a random string.

    Parameters
    ----------
    n : int
        length of a character string
    
    Returns
    -------
        : string
        random string
    """
    return ''.join(random.choices(string.ascii_letters + string.digits, k=n))

def extract_mail_address(m_from):
    """
    Extracting email addresses from a string.

    Parameters
    ----------
    m_from : string
        String containing an email address
    
    Returns
    -------
        : list
        email addresses 
    """
    pattern = r'[a-zA-Z0-9_.+-]+@[a-zA-Z0-9-]+\.[a-zA-Z0-9-.]+'
    return re.findall(pattern, m_from)[0]

def extract_display_name(m_from):
    """    
    Extracting display name from a Mail From.

    Parameters
    ----------
    m_from : string
        String containing an email address
    
    Returns
    -------
        : string
        display name
    """
    delimiter = ' <'

    if delimiter in m_from:
        idx = m_from.find(delimiter)
        logger.info("There is Display Name")
        return m_from[:idx]
    else:
        logger.info("There is no Display Name")
        return "no_display_name"

Lambda ( Slack 通知 )

通知用の Lambda は、特定のディレクトリ名 ( メールの From ) 配下にオブジェクトが作成されたことを EventBridge が検知しキックされる想定です。
つきましては、検知させる From 毎に EventBridge と Lambda の組を用意する可能性があったため、モジュール読み込みの際に複数のリソースの組を定義できるように工夫し、且つ、本リポジトリで管理していない Lambda も参照できる形にしています。

※ notifier_groups にリストとして EventBridge と Lambda の組を渡します。

・notifier.tf.example

module "notifier" {
  source = "./modules/notifier"

  project     = var.project
  environment = var.environment

  notifier_groups = [
    {
      // Unique identifier
      name = "xxxx"
      // Triggering buckets
      bucket_name = "xxxx"
      // Triggering first renovation folder
      prefix = "xxxx"
      // Lambda Arn
      lambda_arn = "xxxx"
      // Lambda Function name
      lambda_function_name = "xxxx"
    },
    {
      name                 = "xxxx"
      bucket_name          = "xxxx"
      prefix               = "xxxx"
      lambda_arn           = "xxxx"
      lambda_function_name = "xxxx"
    },
    {
      name                 = "xxxx"
      bucket_name          = "xxxx"
      prefix               = "xxxx"
      lambda_arn           = "xxxx"
      lambda_function_name = "xxxx"
    }
  ]
}

Slack 通知用の Lambda は EventBridge から渡されたオブジェクトを読み込み、適宜整形して Slack の WebhookURL にリクエストを発行する流れとなります。

From の種類ごとに、異なった処理を行う Lambda 関数を用意する想定なので、1 サンプルとして基本的な Lambda 関数をリポジトリに配置しています。

・modules/notifier/example/slack/lambda/source/slack.py

import boto3
import json
import logging
import os
import re

from base64 import b64decode
from urllib.request import Request, urlopen
from urllib.error import URLError, HTTPError
from urllib.parse import quote

logger = logging.getLogger()
logger.setLevel(logging.INFO)

def lambda_handler(event, context):

    logger.info("Event: " + str(event))

    bucket_name = str(event['detail']['bucket']['name'])
    logger.info("Bucket: " + str(bucket_name))
    object_key = event['detail']['object']['key']
    object_list = event['detail']['object']['key'].split("/")

    for i in object_list:
        logger.info("Object: " + str(i))

    m_from = object_list[0]
    subject = object_list[1]
    date = object_list[2]
    content = read_s3_object(bucket_name, object_key)

    res = notify2slack(m_from, subject, date, content, object_key)

    logger.info("Response: " + str(res))


def read_s3_object(bucket_name, object_key):
    """
    Read files From S3.

    Parameters
    ----------
    bucket_name : string
        Bucket Name
    object_key : string
        File Name ( Path )

    Returns
    -------
    body : dict
        API Return Values
    """

    s3 = boto3.client("s3")

    try:
        res = s3.get_object(
            Bucket=bucket_name,
            Key=object_key
            )
        logger.info("Success: %s", res)
        body = res['Body'].read().decode('utf-8')
    except Exception as e:
        logger.error("Error: %s", e)
    return body

def notify2slack(m_from, subject, date, content, object_key):
    """
    Notify messages to slack.

    Parameters
    ----------
    m_from : string
        Mail From
    subject : string
        Mail Subject
    date : string
        Mail Date
    content : string
        Mail Content
    object_key : string
        File Name ( Path )
        
    Returns
    -------
    res : dict
        API Return Values
    """

    slack_message = {
        "channel": os.environ['channelName'],
        "icon_emoji": ":rotating_light:",
        "attachments": [
            {
                "color": "#FF0000",
                "title": "Email has been received.",
                "text": "<!here> \n *Content* \n ```%s``` \n" % (content),
                "fields": [
                    {
                        "title": "Date",
                        "value": date,
                        "short": True
                    },
                    {
                        "title": "Subject",
                        "value": subject,
                        "short": True
                    },
                    {
                        "title": "From",
                        "value": m_from,
                        "short": True
                    },
                    {
                        "title": "object_key",
                        "value": object_key,
                        "short": True
                    }
                ]

            }
        ]
    }

    req = Request(decrypt_hookurl(os.environ['HookUrl']), json.dumps(slack_message).encode('utf-8'))

    try:
        res = urlopen(req)
        res.read()
        logger.info("Message posted to %s", slack_message['channel'])
    except HTTPError as e:
        logger.error("Request failed: %d %s", e.code, e.reason)
    except URLError as e:
        logger.error("Server connection failed: %s", e.reason)
    return res


def decrypt_hookurl(hookurl):
    """
    Notify messages to slack.

    Parameters
    ----------
    hookurl : string
        WebhookURL that may be encrypted
        
    Returns
    -------
    hookurl : string
        WebhookURL

    decrypted_hookurl : string
        Decrypted WebhookURL
    """

    if  "hooks.slack.com" in hookurl:
        logger.info("HookURL is not Encrypted")
        return hookurl
    else:
        logger.info("HookURL is Encrypted")
        decrypted_hookurl = boto3.client('kms').decrypt(
            CiphertextBlob=b64decode(hookurl),
            EncryptionContext={'LambdaFunctionName': os.environ['AWS_LAMBDA_FUNCTION_NAME']}
        )['Plaintext'].decode('utf-8')
        return decrypted_hookurl

最後に

このブログを始めて、もう少しで 5 年が経過しそうです。
※ IT 業界で働きだしたのが 3 月なので、今月で丁度 5 年になります。
あくまでも自分の備忘録として存在しているサイトですので、稚拙な内容に関しては何卒ご容赦頂けると幸いでございます…。

引き続きどうぞよろしくお願いいたします。(•ᵕᴗᵕ•)

【jq】AWS WAF で Block されたリクエストの一覧を CSV に整形して出力してみる

こんにちは。
AWS WAF により Block されたリクエストの一覧を月一でリスト化する必要がございました。
最初は API を叩いて Sample request を取得し、その後にログ解析を行おうと思ったのですが、どうも、この API には 5000req/3h の制限があるようで断念…。
調べてみると Kinesis Firehose を経由して S3 に JSON 形式で WAF のログを出力できるようです。
ついては出力された S3 のログを引っ張って jq でリスト化すればいいや、となりました。

シェルスクリプト

cron で月末にスクリプトが実行されるよう設定しておけば、あとは放置で OK ですね。

#!/bin/bash

WORK_DIR=""
THIS_YEAR=`date "+%Y"`
THIS_MONTH=`date "+%m"`
S3_BUCKET=""
PROFILE=""
OUTPUTDIR=""
OUTPUT=${OUTPUTDIR}block_requests-`date +'%FT%R'`.csv

# 作業ディレクトリの作成
mkdir -p ${WORK_DIR}/${THIS_YEAR}/${THIS_MONTH}

# S3 からログのダウンロード
aws s3 cp s3://${S3_BUCKET}/${THIS_YEAR}/${THIS_MONTH}/ ${WORK_DIR}/${THIS_YEAR}/${THIS_MONTH} --recursive --profile=${PROFILE}

# csv のフィールド名を出力
echo "Request.ClientIP,TerminatingRuleId,Request.Country,Request.URI,Request.httpVersion,Request.Method,Other" >> ${OUTPUT}

# ログの一覧を取得
SERCH_FILES=`find ${WORK_DIR}/${THIS_YEAR}/${THIS_MONTH} -type f -name aws-waf-logs*`

for SERCH_FILE in ${SERCH_FILES}
do
    # json -> csv の変換 / パース / 出力
    cat ${SERCH_FILE} | jq -r ' select( .action == "BLOCK") | [.httpRequest.clientIp, .terminatingRuleId, .httpRequest.country, .httpRequest.uri, .httpRequest.httpVersion, .httpRequest.httpMethod, "#HeadersName", .httpRequest.headers[].name, "#HeadersValue",.httpRequest.headers[].value, "#RuleGroup", .ruleGroupList[].ruleGroupId, "#RuleMatch", .ruleGroupList[].terminatingRule.ruleId, "#RuleAction", .ruleGroupList[].terminatingRule.action] |@csv' \
    >> ${OUTPUT}
done

jq って便利ですね。

【サーバレス】Lambda + API Gateway + Flask で Web ツールを作ってみる【AWS】

こんにちは。
仕事でサーバレス環境を扱うことがありまして、勉強がてら少し触ってみようと思ったんですね。
先日に SSL/TLS 証明書の整合性チェックツールを Flask で作ったんで、こちらをサーバレス環境で動かしてみます。
https://github.com/keisukesanuki/certificate_verify_flask_lambda

zappa

コードのデプロイ用に zappa というツールがあるそうです。。
下記手順で簡単に Lambda + API Gateway の環境構築とアプリケーションのデプロイが完了するようです。

# 必要なパッケージの導入
yum groupinstall "Development tools" -y
yum install zlib-devel openssl-devel sqlite-devel -y

# pyenvの導入
git clone https://github.com/pyenv/pyenv.git ~/.pyenv
echo 'export PATH="$HOME/.pyenv/bin:$PATH"' >> ~/.bash_profile
echo 'eval "$(pyenv init -)"' >> ~/.bash_profile
source ~/.bash_profile

# pyenv-virtualenvの導入
git clone https://github.com/yyuu/pyenv-virtualenv.git ~/.pyenv/plugins/pyenv-virtualenv
echo 'eval "$(pyenv virtualenv-init -)"' >> ~/.bash_profile
exec $SHELL -l

# 3.6系のpythonを導入
pyenv install 3.6.5
pyenv global 3.6.5

# awscliの導入/設定
pip install -U pip
pip install awscli
aws configure

# ソースの取得
pyenv virtualenv 3.6.5 lambda
git clone https://github.com/keisukesanuki/certificate_verify_flask_lambda.git 
cd certificate_verify_flask_lambda
pyenv local lambda

# モジュールの導入
pip install -U pip
pip install flask
pip install zappa

# lambdaにデプロイ
zappa init
===========================================================================
What do you want to call this environment (default 'dev'): certificateCheck
===========================================================================
zappa deploy

【Lambda】CloudWatch の通知を Lambda で Chatwork に飛ばしてみる【Python】

こんにちは。
表題の通り、CloudWatch の Alarm 通知を Chatwork に通知してみます。
ランタイムは前回と同じく python 3.7 です。
ROOMNO にメッセージを通知するルームナンバ、 TOKEN に ChatWorkToken を定義すれば動きます。

import boto3
import json
import logging
import os
import urllib
 
from base64 import b64decode
from urllib.request import Request, urlopen
from urllib.error import URLError, HTTPError

# Chatwork のルームナンバ定義
ROOMNO = 'xxxxxxxxxxxxxxxx'
 
# WEB_HOOKURL
URL = f'https://api.chatwork.com/v2/rooms/{ROOMNO}/messages'

# ChatWorkToken 定義
TOKEN = 'xxxxxxxxxxxxxxxxxxxxxxxxxxxxxxxx'

logger = logging.getLogger()
logger.setLevel(logging.INFO)
 
 
def lambda_handler(event, context):
    logger.info("Event: " + str(event))

    # メッセージ取得
    message = json.loads(event['Records'][0]['Sns']['Message'])
    logger.info("Message: " + str(message))
 
    alarm_name = message['AlarmName']
    new_state = message['NewStateValue']
    reason = message['NewStateReason']

    # ヘッダ情報
    headers = {
        'X-ChatWorkToken': TOKEN,
    }  
 
    # 通知内容
    sns_message = {
        'body': "%s state is now %s: %s" % (alarm_name, new_state, reason),
    }
    
    # エンコード
    msns_message = urllib.parse.urlencode(sns_message)
    msns_message = msns_message.encode('utf-8') 
    
    # リクエスト発行
    req = Request(URL, data=msns_message, headers=headers)
    with urlopen(req) as res:
        result = json.loads(res.read().decode("utf-8"))

【Ansible】Ansible で AWS の3層ネットワークを構築する【IaC】

こんにちは。
表題の通り AWS の 3層ネットワークを構築する playbook を用意してみます。
※ 詳細は README を参照ください。
https://github.com/keisukesanuki/aws-vpc-3layer

作るもの

・VPC
・SUBNET
・INTERNETGATEWAY
・NATGATEWAY
・ROUTETABLE

ディレクトリ構造

.
├── README.md
├── ansible.cfg
├── hosts
├── roles
│   └── aws_vpc
│       ├── tasks
│       │   └── main.yml
│       └── vars
│           └── main.yml
└── vpc_create.yml

playbook

---
# tasks file for aws_vpc
- name: create_vpc
  ec2_vpc_net:
    name: "{{ vpc_name }}"
    cidr_block: "{{ vpc_cidr }}"
    region: "{{ region }}"
    profile: "{{ profile }}"
    dns_hostnames: yes
    dns_support: yes
  register: vpc_info

# PUBLIC_SUBNET 作成
- name: create_public_subnet
  ec2_vpc_subnet:
    vpc_id: "{{ vpc_info.vpc.id }}"
    cidr: "{{ item.pub_subnet_cidr }}"
    az: "{{ item.subnet_az }}"
    region: "{{ region }}"
    resource_tags: { "Name":"{{ item.pub_subnet_name }}" }
    profile: "{{ profile }}"
  register: pubsub_info
  with_items:
    - "{{ pub_subnet }}"

# DMZ_SUBNET 作成
- name: create_dmz_subnet
  ec2_vpc_subnet:
    vpc_id: "{{ vpc_info.vpc.id }}"
    cidr: "{{ item.dmz_subnet_cidr }}"
    az: "{{ item.subnet_az }}"
    region: "{{ region }}"
    resource_tags: { "Name":"{{ item.dmz_subnet_name }}" }
    profile: "{{ profile }}"
  register: pubsub_info
  with_items:
    - "{{ dmz_subnet }}"

# PRIVATE_SUBNET 作成
- name: create_private_subnet
  ec2_vpc_subnet:
    vpc_id: "{{ vpc_info.vpc.id }}"
    cidr: "{{ item.pri_subnet_cidr }}"
    az: "{{ item.subnet_az }}"
    region: "{{ region }}"
    resource_tags: { "Name":"{{ item.pri_subnet_name }}" }
    profile: "{{ profile }}"
  register: prisub_info
  with_items:
    - "{{ pri_subnet }}"

# IGW 作成
- name: create_igw
  ec2_vpc_igw:
    vpc_id: "{{ vpc_info.vpc.id }}"
    region: "{{ region }}"
    tags: { "Name":"{{ igw_name }}" }
    profile: "{{ profile }}"
  register: igw_info

# ROUTETABLE 作成(IGW)
- name: create_route_table
  ec2_vpc_route_table:
    vpc_id: "{{ vpc_info.vpc.id }}"
    subnets: "{{ atache_igw_subnet }}"
    routes:
      - dest: 0.0.0.0/0
        gateway_id: "{{ igw_info.gateway_id }}"
    region: "{{ region }}"
    profile: "{{ profile }}"
    resource_tags: { "Name":"{{ rttable_pub_name }}" }

# NGW の ID を取得
- name: get_subnet_id
  shell: aws ec2 describe-subnets --region {{ region }} --profile {{ profile }} --output text | grep -B 1 {{ ngw_subnet_name }} | awk 'NR==1 {print $12}'
  register: ngw_subnet_id

#- name: show
#  debug:
#    msg: "{{ ngw_subnet_id.stdout }}"

# NGW 作成
- name: create_ngw
  ec2_vpc_nat_gateway:
    subnet_id: "{{ ngw_subnet_id.stdout }}"
    region: "{{ region }}"
    profile: "{{ profile }}"
  register: ngw_info

#- name: show
#  debug:
#    msg: "{{ ngw_info.nat_gateway_id }}"

# NGW 作成まで待つ
- name: wait_for_ngw
  pause:
    minutes: 5

# ROUTETABLEの作成(NGW)
- name: create_route_table2
  ec2_vpc_route_table:
    vpc_id: "{{ vpc_info.vpc.id }}"
    subnets: "{{ atache_ngw_subnet }}"
    routes:
      - dest: 0.0.0.0/0
        gateway_id: "{{ ngw_info.nat_gateway_id }}"
    region: "{{ region }}"
    profile: "{{ profile }}"
    resource_tags: { "Name":"{{ rttable_dmz_name }}" }

NATGATEWAY の ID が上手く取得できなかったので awscli の結果をパースして ngw_subnet_id に渡しています。

変数定義

---
# vars file for aws_vpc

# REGION
  region: "ap-northeast-1"

# PROFILE
  profile: "default"

# VPC
  vpc_name: "sanuki-wd-vpc2"
  vpc_cidr: "10.10.0.0/16"

# IGW
  igw_name: "sanuki-igw2"

# NGW
  ngw_name: "sanuki-ngw2"


# NGWを作成するサブネット名
  ngw_subnet_name: "sanuki-wd-public-subnet2-a"

# ROUTETABLE(PUBLIC)
  rttable_pub_name: "sanuki-pub-rt2"

# ROUTETABLE(DMZ)
  rttable_dmz_name: "sanuki-dmz-rt2"

# PUBLIC_SUBNET
  pub_subnet:
    - { pub_subnet_cidr: "10.10.10.0/24" ,subnet_az: "ap-northeast-1a" ,pub_subnet_name: "sanuki-wd-public-subnet2-a" }
    - { pub_subnet_cidr: "10.10.20.0/24" ,subnet_az: "ap-northeast-1c" ,pub_subnet_name: "sanuki-wd-public-subnet2-c" }


# DMZ_SUBNET
  dmz_subnet:
    - { dmz_subnet_cidr: "10.10.30.0/24" ,subnet_az: "ap-northeast-1a" ,dmz_subnet_name: "sanuki-wd-dmz-subnet2-a" }
    - { dmz_subnet_cidr: "10.10.40.0/24" ,subnet_az: "ap-northeast-1c" ,dmz_subnet_name: "sanuki-wd-dmz-subnet2-c" }


# PRIVATE_SUBNET
  pri_subnet:
    - { pri_subnet_cidr: "10.10.50.0/24" ,subnet_az: "ap-northeast-1a" ,pri_subnet_name: "sanuki-wd-private-subnet2-a" }
    - { pri_subnet_cidr: "10.10.60.0/24" ,subnet_az: "ap-northeast-1c" ,pri_subnet_name: "sanuki-wd-private-subnet2-c" }

# IGWに紐付けるサブネット
  atache_igw_subnet:
    - "10.10.10.0/24"
    - "10.10.20.0/24"

# NGWに紐付けるサブネット
  atache_ngw_subnet:
    - "10.10.30.0/24"
    - "10.10.40.0/24"

NatGateway が片方の AZ にしかないため、冗長性の観点からは ? となりますが、まぁいいでしょう。

↓ 2層の playbook はこちら

【Ansible】AnsibleでAWSのネットワークを構築する【IaC】

【AWS】Data Lifecycle Manager を CloudFormation で設定してみた【dlm】

EBS のスナップショットを取得する Data Lifecycle Manager というマネージドサービスがございます。
こちらを一括で設定する CloudFormation のテンプレートを作成しました。

AWSTemplateFormatVersion: "2010-09-09"
Description: "DLM Configuration YAML"

# パラメータセッティング
Parameters:
  ProjectName:
    Type: String
  LotateNum:
    Type: Number
    Default: 3
  GetTime:
    Type: String
    Default: "18:00"

Resources:
  
  # DLM IAM ロール作成
  CreateDlmRole:
    Type: AWS::IAM::Role
    Properties:
      RoleName: 'AWSDataLifecycleManagerDefaultRole'
      AssumeRolePolicyDocument:
        Version: '2012-10-17'
        Statement:
          - Effect: Allow
            Principal:
              Service:
                - dlm.amazonaws.com
            Action:
              - sts:AssumeRole
      Path: /service-role/
      ManagedPolicyArns:
        - arn:aws:iam::aws:policy/service-role/AWSDataLifecycleManagerServiceRole
        
  # DLM 作成
  BasicLifecyclePolicy:
    Type: "AWS::DLM::LifecyclePolicy"
    Properties:
      Description: !Join [ "-", [ !Ref ProjectName, dlm ] ]
      State: "ENABLED"
      ExecutionRoleArn: !Sub "arn:aws:iam::${AWS::AccountId}:role/service-role/AWSDataLifecycleManagerDefaultRole"
      PolicyDetails:
        ResourceTypes:
          - "VOLUME"
        TargetTags:
          -
            Key: "dlmtarget"
            Value: "true"

        Schedules:
          -
            Name: !Join [ "-", [ !Ref ProjectName, daily-schedule ] ]
            TagsToAdd:
              -
                Key: "type"
                Value: !Join [ "-", [ !Ref ProjectName, scheduled-snapshot ] ]

            CreateRule:
              Interval: 24
              IntervalUnit: "HOURS"
              Times:
                - !Ref GetTime

            RetainRule:
              Count: !Ref LotateNum
            CopyTags: true

各種パラメータは下記の通りに設定して下さい。
・ProjectName ⇒ DLM リソース の prefix
・LotateNum ⇒ スナップショットの保持期間を指定
・GetTime ⇒ スナップショットの取得時間を UTCで指定 ( 例:10:00、08:35、02:48 )

【AWS】EBS のスナップショットを取得して世代管理してみる【シェルスクリプト】

こんにちは。
表題の通りです。
DLM でもよいのですが、最長のインターバルが 24 時間なので、要件が合わない時のために。

#!/bin/sh

# スナップショットの保持世代数を定義
LOTATE_NUM=3
# ホストネームを定義
HOSTNAME=
# スナップショットを取得するボリュームIDを定義
VOLID=

# スナップショットを取得
aws ec2 create-snapshot --volume-id $VOLID --tag-specification 'ResourceType="snapshot",Tags=[{Key="Name",Value="script-create"}]' --description "$HOSTNAME snapshot"

# 指定した世代数分になるようにスナップショットを削除
SNAPSHOTS_NUM=`aws ec2 describe-snapshots --output text | grep $VOLID | grep "$HOSTNAME snapshot" | wc -l`
while [ ${SNAPSHOTS_NUM} -gt ${LOTATE_NUM} ]
do
        aws ec2 delete-snapshot --snapshot-id `aws ec2 describe-snapshots --output text | grep $VOLID | grep "$HOSTNAME snapshot" | sort -k 8 | awk 'NR==1 {print $7}'`
        SNAPSHOTS_NUM=`aws ec2 describe-snapshots --output text | grep $VOLID | grep "$HOSTNAME snapshot" | wc -l`
done

# awscli の導入

curl "https://bootstrap.pypa.io/get-pip.py" -o "get-pip.py"
sudo python get-pip.py
sudo pip install awscli
aws configure

【CloudWatch】AutoScaling のメモリ/ディスク使用率のグループメトリクスを取得する【AWS】

AutoScaling のグループメトリクスとして、メモリとディスク使用率を取得する必要がございました。
調べると AWS がメトリクス取得用のスクリプトを提供しているようです。
https://docs.aws.amazon.com/ja_jp/AWSEC2/latest/UserGuide/mon-scripts.html

# 必要なパッケージの導入
yum install -y perl-Switch perl-DateTime perl-Sys-Syslog perl-LWP-Protocol-https perl-Digest-SHA.x86_64
# ディレクトリ移動
cd /usr/local/src/
# スクリプトのインストール
curl https://aws-cloudwatch.s3.amazonaws.com/downloads/CloudWatchMonitoringScripts-1.2.2.zip -O
# スクリプトの解凍
unzip CloudWatchMonitoringScripts-1.2.2.zip && rm CloudWatchMonitoringScripts-1.2.2.zip && cd aws-scripts-mon
# テスト実行
./mon-put-instance-data.pl --mem-util --mem-used --mem-avail --disk-space-util --disk-path=/ --auto-scaling=only
# cronで5分毎に実行
crontab -e
=====================================================================================================================================================================
*/5 * * * * /usr/local/src/aws-scripts-mon/mon-put-instance-data.pl --mem-util --mem-used --mem-avail --disk-space-util --disk-path=/ --auto-scaling=only --from-cron

※ EC2 から CloudWatch を操作できる権限を持った IAM ロールを事前にアタッチしておく必要がございます。
※ インスタンス毎にキャッシュファイルが作成されるので、EC2 起動時にキャッシュファイルを削除するよう UserData を設定しておきます。
#!/bin/bash
rm -rf /var/tmp/aws-mon/*

※ cloudwatch-agent もありますが、こちらではグループメトリクスは取得できないようです。

【Lambda】アラート通知を判別して別々の絵文字を付与し Slack に通知してみる【slack】

【Lambda】CloudWatch の通知を Lambda で Slack に飛ばしてみる【Slack】


↑ 前回の記事の続きです。

アラーム、リカバリ時の通知が判別し辛いので、それぞれの通知に対して別々の絵文字を付与してみます。
※ ランタイムは python3.7 です。

import boto3
import json
import logging
import os

from base64 import b64decode
from urllib.request import Request, urlopen
from urllib.error import URLError, HTTPError


# 通知するチャンネル定義
SLACK_CHANNEL = "#xxxxxx"

# WEB_HOOKURL 定義
HOOK_URL = "https://hooks.slack.com/services/xxxxxxxxxxxxxxxxxxxxxxxxxxxxxxxxxxxxx"

logger = logging.getLogger()
logger.setLevel(logging.INFO)


def lambda_handler(event, context):
    logger.info("Event: " + str(event))
    message = json.loads(event['Records'][0]['Sns']['Message'])
    logger.info("Message: " + str(message))

    alarm_name = message['AlarmName']
    new_state = message['NewStateValue']
    reason = message['NewStateReason']

    stamp = ":warning:"
    if new_state == "ALARM":
        stamp = ":warning:"
    else:
        stamp = ":ok_woman:"
        
    slack_message = {
        'channel': SLACK_CHANNEL,
        'text': "%s %s state is now %s: %s" % (stamp, alarm_name, new_state, reason)
    }

    req = Request(HOOK_URL, json.dumps(slack_message).encode('utf-8'))
    try:
        response = urlopen(req)
        response.read()
        logger.info("Message posted to %s", slack_message['channel'])
    except HTTPError as e:
        logger.error("Request failed: %d %s", e.code, e.reason)
    except URLError as e:
        logger.error("Server connection failed: %s", e.reason)

CloudWatch からの通知が ALARM であれば :warning: を付与、それ以外であれば :ok_woman: を付与します。

【Lambda】CloudWatch の通知を Lambda で Slack に飛ばしてみる【Slack】

担当している案件で CloudWatch からの通知を Slackに飛ばす必要があったので、Lambda で実装してみます。

1.事前準備

■ 通知を飛ばす Slack に Incoming WebHooks を追加しておく
https://slack.com/services/new/incoming-webhook

■ 必要なポリシーを付与した IAM ロールを作成しておく
・CloudWatchReadOnlyAccess
・AWSLambdaBasicExecutionRole

■ CloudWatch + SNS の通知設定

2.Lambda設定

Lambda > 関数 > 関数の作成 > 一から作成

関数名:<>
ランタイム:python 3.7
実行ロールの選択: 事前準備で作成したIAMロール

> トリガーを追加

トリガーの設定:SNS
SNS トピック:「事前準備で作成したSNSトピック」
トリガーの有効化:有効

関数コード

import boto3
import json
import logging
import os

from base64 import b64decode
from urllib.request import Request, urlopen
from urllib.error import URLError, HTTPError


# 通知を飛ばすチャンネルを定義
SLACK_CHANNEL = "#xxxxxx"

# WEB_HOOKURLを定義
HOOK_URL = "https://hooks.slack.com/services/xxxxxxxxxxxxxxxxxxxxxxxxxxxxxxxxxxxxx"

logger = logging.getLogger()
logger.setLevel(logging.INFO)


def lambda_handler(event, context):
    logger.info("Event: " + str(event))
    message = json.loads(event['Records'][0]['Sns']['Message'])
    logger.info("Message: " + str(message))

    alarm_name = message['AlarmName']
    #old_state = message['OldStateValue']
    new_state = message['NewStateValue']
    reason = message['NewStateReason']

    slack_message = {
        'channel': SLACK_CHANNEL,
        'text': "%s state is now %s: %s" % (alarm_name, new_state, reason)
    }

    req = Request(HOOK_URL, json.dumps(slack_message).encode('utf-8'))
    try:
        response = urlopen(req)
        response.read()
        logger.info("Message posted to %s", slack_message['channel'])
    except HTTPError as e:
        logger.error("Request failed: %d %s", e.code, e.reason)
    except URLError as e:
        logger.error("Server connection failed: %s", e.reason)

⇒「SLACK_CHANNEL」「HOOK_URL」に通知を飛ばすチャンネル名とWebHookURLを定義してください。