こんにちは。お久しぶりです。
今年の春に受験した IPA のネットワークスペシャリスト試験に合格しているのを確認し、ホっと胸をなで下ろしている今日この頃です。
さて、ちょうど AWS が Fargate ネイティブの Blue/Green デプロイを公式サポートしたところではありますが、普段 CodeDeploy と AWS 公式の GitHub Actions を使って組んでいるデプロイ機構に関して、あえて公式のアクション ( amazon-ecs-deploy-task-definition 等 ) を使わずに実装してみようと思います。
※ シェルと CLI で頑張る?という謎な縛りで実装する備忘録になります。いったい何の役に立つのやら。
構成
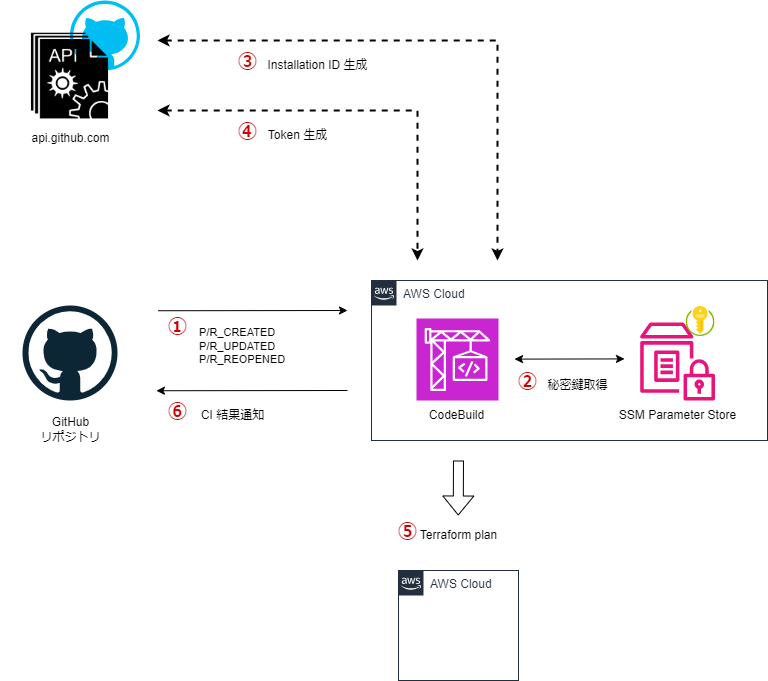
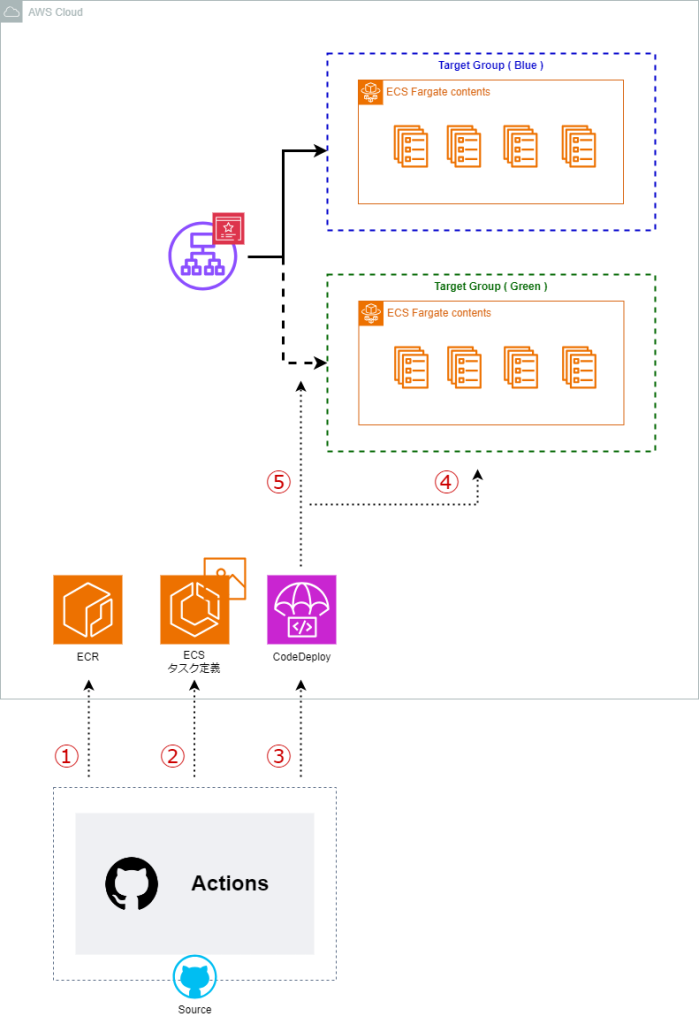
以下の図のように GitHub Actions でコンテナイメージのビルド、及び ECR への PUSH と、タスク定義登録、CodeDeploy のキックを行います。
今回は主に GitHub Actions の WorkFlow の処理に着目してみます。
詳細な処理のシーケンスは以下の通りです。
① ビルドしたコンテナイメージを ECR に PUSH
② タスク定義を編集し、新規登録
③ AppSpec の内容を更新し、CodeDeploy を起動
④ Green のターゲットグループ内で新イメージを元に ECS タスクが起動
⑤ ALB からの同線を Green に切り替え
Actions ( steps )
⓪ 事前処理
リポジトリのコードをチェックアウトし、IAM Role から一時的な認証情報を取得します。
ECR へのログインも済ませておきます。
※ ココだけ AWS 公式のアクションを使います。( 早速のレギュ違反 )
jobs:
  deploy:
    runs-on: ubuntu-latest
    steps:

      - name: Checkout
        uses: actions/checkout@v4

      - name: Configure AWS credentials
        uses: aws-actions/configure-aws-credentials@v4.0.2
        with:
          role-to-assume: ${{ inputs.role-arn }}
          aws-region: ${{ inputs.region }}

      - name: Login to Amazon ECR
        uses: aws-actions/amazon-ecr-login@v2.0.1
① ビルドしたコンテナイメージを ECR に PUSH
Docker のコンテナイメージをビルドし、ビルドしたイメージへタグを付与、そして ECR へ PUSH します。
      - name: Build and push the image
        env:
          IMAGE_URI: ${{ inputs.image-uri }}
          IMAGE_TAG: ${{ inputs.github-sha }}
        run: |
          docker build -f ./Dockerfile -t src_image .
          docker tag src_image ${IMAGE_URI}:${IMAGE_TAG}
          docker push ${IMAGE_URI}:${IMAGE_TAG}
※ タグ ( IMAGE_TAG ) には コミット SHA を使用する想定です。
on:
  workflow_call:
    inputs:
      github-sha:
        required: false
        default: ${{ github.sha }}
        type: string
② タスク定義を編集し、新規登録
① で PUSH したイメージでタスクが起動するように、タスク定義の内容を更新し、AWS へ登録します。
ここで登録したタスク定義の ARN は後続の処理で使う想定です。
      - name: Edit taskdefinition
        env:
          IMAGE_URI: ${{ inputs.image-uri }}
          IMAGE_TAG: ${{ inputs.github-sha }}
          TASK_DEF_FILE: ${{ inputs.task-def-file }}
        run: |
          sed -i "s#<IMAGE_TAG>#${IMAGE_TAG}#g" ${TASK_DEF_FILE}
          sed -i "s#<IMAGE_URI>#${IMAGE_URI}#g" ${TASK_DEF_FILE}
          cat ${TASK_DEF_FILE}

      - name: Registe taskdefinition
        id: register-task
        env:
          IMAGE_URI: ${{ inputs.image-uri }}
          IMAGE_TAG: ${{ inputs.github-sha }}
          TASK_DEF_FILE: ${{ inputs.task-def-file }}
        run: |
          TASK_DEF_ARN=$(aws ecs register-task-definition \
            --cli-input-json file://${TASK_DEF_FILE} \
            --query 'taskDefinition.taskDefinitionArn' --output text)
          echo "task_definition_arn=${TASK_DEF_ARN}" >> $GITHUB_OUTPUT
③ AppSpec の内容を更新し、CodeDeploy を起動
AppSpec テンプレートファイル ( ※① ) にある
置き換えた結果を appspec-tmp.yml という一時的なファイルとして保存します。
CodeDeploy に渡すリビジョン JSON 構築のため、先のステップで作った appspec-tmp.yml を jq コマンドで JSON 文字列へ変換しつつ appSpecContent の値として埋め込みます。
最後に aws deploy create-deployment を実行し、 CodeDeploy による ECS デプロイを開始します。
      - name: Replace task definition ARN in AppSpec
        env:
          APPSPEC_FILE: ${{ inputs.appspec-file }}
        run: |
          sed "s|<TASK_DEFINITION>|${{ steps.register-task.outputs.task_definition_arn }}|g" ${APPSPEC_FILE} > ./appspec-tmp.yml

      - name: Create CodeDeploy revision JSON
        id: revision-json
        run: |
          APPSPEC=$(cat ./appspec-tmp.yml | jq -Rs .)
          REVISION='{"revisionType":"AppSpecContent","appSpecContent":{"content":'${APPSPEC}'}}'
          echo "revision_json=${REVISION}" >> $GITHUB_OUTPUT

      - name: Create deployment
        id: create-deployment
        env:
          CODEDEPLOY_APP_NAME: ${{ inputs.codedeploy-application }}
          CODEDEPLOY_DEPLOY_GROUP: ${{ inputs.codedeploy-deployment-group }}
          GITHUB_SHA: ${{ inputs.github-sha }}
        run: |
          DEPLOYMENT_ID=$(aws deploy create-deployment \
            --application-name ${CODEDEPLOY_APP_NAME} \
            --deployment-group-name ${CODEDEPLOY_DEPLOY_GROUP} \
            --revision '${{ steps.revision-json.outputs.revision_json }}' \
            --description "Deploy from commit ${GITHUB_SHA}" \
            --output text)
          echo "deployment_id=${DEPLOYMENT_ID}" >> $GITHUB_OUTPUT
          echo "Started deployment: ${DEPLOYMENT_ID}"
※① AppSpec テンプレートファイルのサンプルは以下の通りです。
▶ AppSpec のサンプル
version: 0.0
Resources:
  - TargetService:
      Type: AWS::ECS::Service
      Properties:
        TaskDefinition: <TASK_DEFINITION>
        LoadBalancerInfo:
          ContainerName: "snkk1210-sandbox-hoge-hoge01"
          ContainerPort: 80
        PlatformVersion: "1.4.0"
④ / ⑤
後続の処理は CodeDeploy が代行してくれるので、WorkFlow 上では wait を使って、処理完了まで待機します。
必要な処理はココまでです。
      - name: Wait for deployment to finish and show URL
        env:
          REGION: ${{ inputs.region }}
        run: |
          DEPLOYMENT_ID="${{ steps.create-deployment.outputs.deployment_id }}"
          echo "View deployment in AWS Console:"
          echo "https://${REGION}.console.aws.amazon.com/codesuite/codedeploy/deployments/${DEPLOYMENT_ID}?region=${REGION}"
          echo "Waiting for deployment to complete..."
          aws deploy wait deployment-successful --deployment-id "$DEPLOYMENT_ID"
終わりに
冒頭でも触れたとおり、Fargate ネイティブの Blue/Green デプロイが公式サポートされたようで、これからは CodeDeploy を使ったデプロイ機構が非推奨になる?ようです。
将来的に公式アクションもサポートされなくなる可能性があるかも?と思い、今回、中身の代替手段を調べた次第でした。